蓝绿发布是一种通过资源冗余来换取回滚效率的发布方式,结合 Argo Rollout ,能够很方便地实现自动化的流量切换。
但是它的缺点也是比较明显的:当新环境准备好之后,流量将进行全量切换,无法对新环境进行小规模的流量验证。
为了更好地了解新环境的性能和潜在的问题,最好的办法是让新的环境接收一小部分生产流量。通常,我们会把一定比例的生产流量转发到新的环境,以此来验证新环境的表现。这种发布方式就叫做金丝雀发布,又叫做灰度发布。
在矿物开采早期,由于缺少有毒气体探测器,矿工下井之后的死亡率非常高。后来,人们发现金丝雀鸟对有害气体非常敏感,于是把金丝雀鸟投入到矿井中充当探测器的角色,以此来保护矿工。
新环境就像金丝雀鸟,首当其冲“探测”生产环境的潜在问题,以此来提升发布的安全性。
在这节课,我会先通过一个例子来说明如何以手动的方式来实施金丝雀发布,然后,我会结合 Argo Rollout 这款工具来进一步介绍如何自动化金丝雀发布过程。
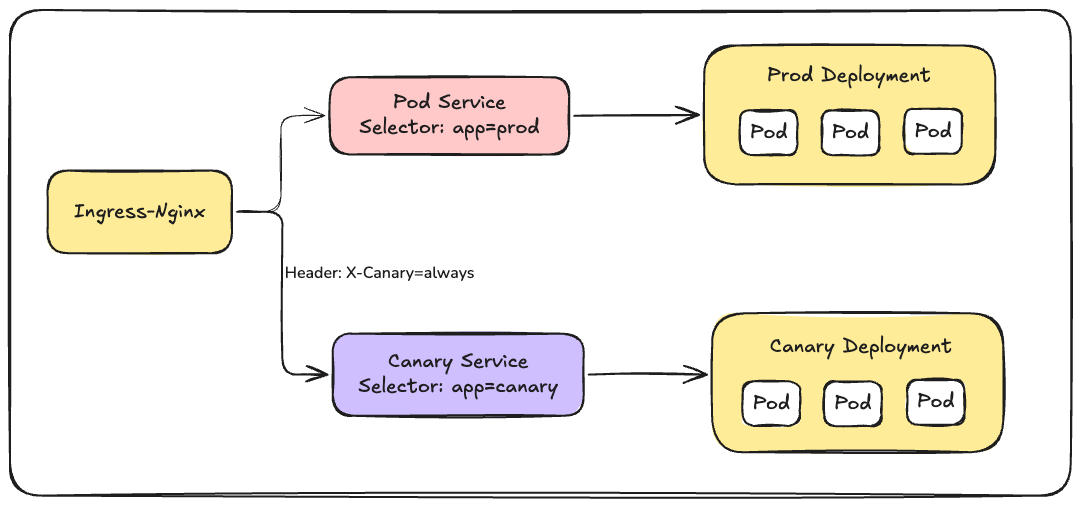
为了更好地帮助你理解金丝雀发布,在正式操作之前,我们先来了解一下它的整体架构,如下图所示。

在上面这张架构图中,我们会对同一个应用部署两套环境,一套是 Prod 生产环境,另一套是 Canary 金丝雀环境。这两套环境分别由不同的 Service 通过选择器进行关联,最外层通过 Ingress-Nginx 网关将流量按不同的比例转发到 Service 当中。比如,图中 20% 的流量将会转发到金丝雀环境,80% 的流量会转发到生产环境,这实际上是一种流量负载均衡的算法。
除了以不同比例分发流量以外,金丝雀发布还可以通过特定的 Header 来进行识别和分发流量,如下图所示。
开始操作(金丝雀)
使用 Kubernetes 原生的 Deployment 和 Service 来进行金丝雀发布,主要包含下面几个步骤:
- 创建生产环境的 Deployment 和 Service。
- 创建生产环境 Ingress 策略,并指向生产环境的 Service。
- 访问生产环境。
- 创建金丝雀环境的 Deployment 和 Service。
- 创建金丝雀环境 Ingress 策略,并实现按比例分发和识别特殊流量分发。
- 访问生产环境。
创建生产环境
首先,我们需要先创建生产环境。将下面的内容保存为 canary_prod_deployment.yaml 文件。
apiVersion: apps/v1
kind: Deployment
metadata:
  name: prod
  labels:
    app: prod
spec:
  replicas: 1
  selector:
    matchLabels:
      app: prod
  template:
    metadata:
      labels:
        app: prod
    spec:
      containers:
        - name: demo
          image: argoproj/rollouts-demo:blue
          imagePullPolicy: Always
          ports:
            - containerPort: 8080
---
apiVersion: v1
kind: Service
metadata:
  name: prod-service
  labels:
    app: prod
spec:
  ports:
    - protocol: TCP
      port: 80
      targetPort: 8080
  selector:
    app: prod
  type: ClusterIP
在上面这段 Manifest 中,我们使用了 argoproj/rollouts-demo:blue 镜像来模拟创建生产环境的 Deployment 工作负载,并且创建了名为 prod-service 的 Service 对象,同时通过 Service 选择器将 Service 和 Pod 进行了关联。
然后,使用 kubectl apply 命令将示例应用部署到集群内。
$ kubectl apply -f prod_deployment.yaml
deployment.apps/prod created
service/prod-service created
当看到上面的输出后,代表生产环境已经准备好了。接下来,再创建生产环境的 Ingress 策略。将下面的内容保存为 canary_prod_ingress.yaml 文件。
apiVersion: networking.k8s.io/v1
kind: Ingress
metadata:
  name: prod-ingress
spec:
  rules:
  - host: "canary.demo"
    http:
      paths:
      - pathType: Prefix
        path: "/"
        backend:
          service:
            name: prod-service
            port:
              number: 80
访问生存环境
访问地址。就可以看到下面截图的页面。
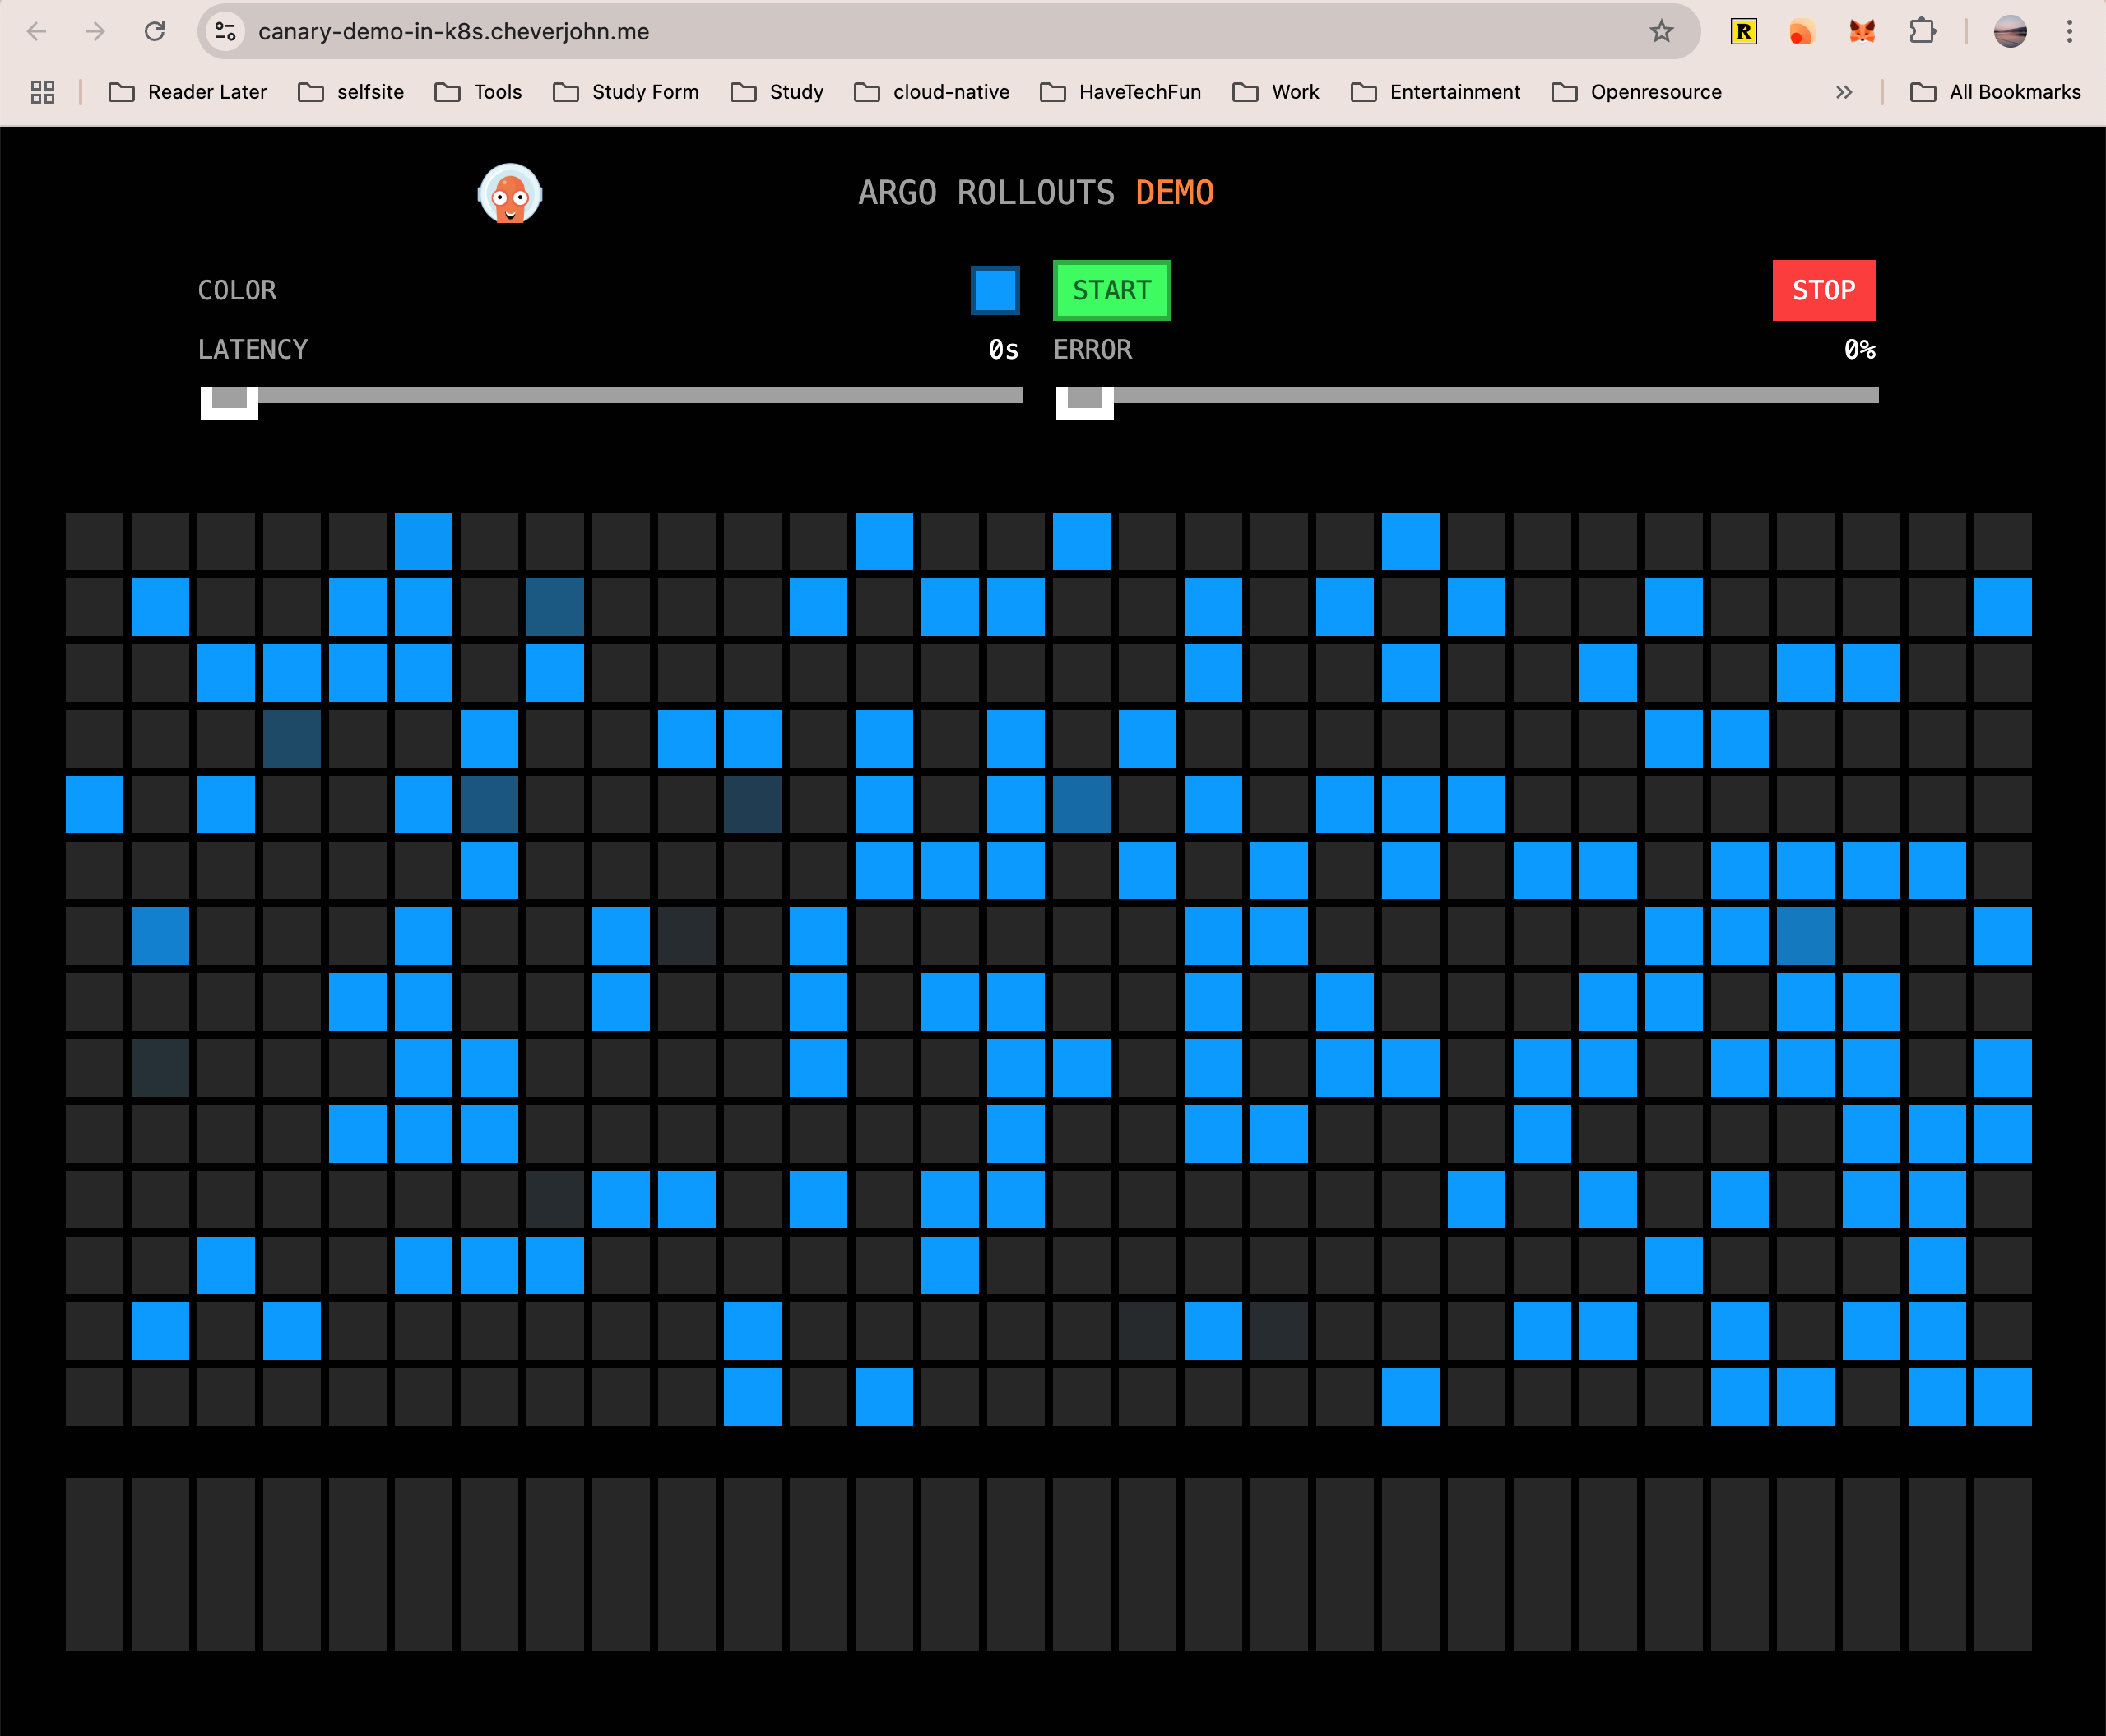
在这个页面里,浏览器每秒钟会向后端发出 50 个请求,蓝色的方块代表后端返回接口的内容为 blue,对应的是 argoproj/rollouts-demo:blue 版本的镜像,用来模拟生产环境。
部署金丝雀环境
假设我们需要以金丝雀发布的方式来更新环境,首先需要先创建金丝雀环境。将下面内容保存为 canary_deployment.yaml。
apiVersion: apps/v1
kind: Deployment
metadata:
  name: canary
  labels:
    app: canary
spec:
  replicas: 1
  selector:
    matchLabels:
      app: canary
  template:
    metadata:
      labels:
        app: canary
    spec:
      containers:
      - name: demo
        image: argoproj/rollouts-demo:green
        imagePullPolicy: Always
        ports:
        - containerPort: 8080
---
apiVersion: v1
kind: Service
metadata:
  name: canary-service
  labels:
    app: canary
spec:
  ports:
  - protocol: TCP
    port: 80
    targetPort: 8080
  selector:
    app: canary
  type: ClusterIP
在这段 Manifest 中,我们用 argoproj/rollouts-demo:green 镜像来模拟创建金丝雀环境的 Deployment,并且创建了名为 canary-service 的 Service 对象。
kubectl apply 部署完成。
$ kubectl apply -f canary_deployment.yaml
deployment.apps/canary created
service/canary-service created
部署完成后,等待工作负载 Ready。
$ kubectl wait pods -l app=canary --for condition=Ready --timeout=90s
pod/canary-579d4b57d6-fpg29 condition met
当看到上面的输出后,代表金丝雀环境已经准备好了。
配置金丝雀策略
现在,生产环境和金丝雀环境都已经准备好,接下来我们需要配置金丝雀环境的 Ingress 策略。将下面的内容保存为 canary_ingress.yaml 文件。
apiVersion: networking.k8s.io/v1
kind: Ingress
metadata:
  name: canary-ingress-canary
  annotations:
    cert-manager.io/cluster-issuer: letsencrypt-prod
    kubernetes.io/ingress.class: "nginx"
    nginx.ingress.kubernetes.io/canary: "true"
    nginx.ingress.kubernetes.io/canary-weight: "20"
    nginx.ingress.kubernetes.io/canary-by-header: "X-Canary"
spec:
  rules:
    - host: "canary-demo-in-k8s.cheverjohn.me"
      http:
        paths:
          - pathType: Prefix
            path: "/"
            backend:
              service:
                name: canary-service
                port:
                  number: 80
  tls:
    - hosts:
        - canary-demo-in-k8s.cheverjohn.me
      secretName: canary-demo-in-k8s-tls
  ingressClassName: "nginx"
相比较生产环境的 Ingress 策略,这段金丝雀环境的 Ingress 策略在 metadata.annotations 字段上有明显的差异,下面我简单介绍一下。
nginx.ingress.kubernetes.io/canary 字段的值为 true,表示启用金丝雀发布策略。
nginx.ingress.kubernetes.io/canary-weight 字段的值为 20,表示将 20% 的流量转发到金丝雀环境当中,实际上这是负载均衡的加权轮询机制。
nginx.ingress.kubernetes.io/canary-by-header 字段的值为 X-Canary,代表当 Header 中包含 X-Canary 时,则无视流量比例规则,将请求直接转发到金丝雀环境中。
所以,上面的 Ingress 策略实际上同时配置了基于请求流量比例以及请求头的金丝雀策略。
现在,将金丝雀环境的 Ingress 策略应用到集群内。
金丝雀发布自动化
上面提到手动金丝雀发布过程比较麻烦,我们除了需要手动创建生产和金丝雀两个环境以外,还需要手动配置 Ingress 策略,如果想要调整金丝雀环境的流量比例,那么就需要多次修改 Ingress 策略。这种发布方式效率很低,并且最后将金丝雀环境提升为生产环境时也需要手动处理。
但是借助 Argo Rollout 的自动金丝雀发布功能,就能很好地解决这些问题。
在使用 Argo Rollout 之前,你需要先在集群里安装它,并在本地安装好 Argo Rollout kubectl 插件。
创建 Rollout 对象
为了实现自动化的金丝雀发布过程,我们需要用到 Rollout 对象。它可以帮助我们自动管理金丝雀发布过程中涉及到的 ReplicaSet、Service 和 Ingress 对象。
首先,你需要将下面的内容保存为 canary-rollout.yaml 文件。
apiVersion: argoproj.io/v1alpha1
kind: Rollout
metadata:
  name: canary-demo
  labels:
    app: canary-demo
spec:
  replicas: 1
  selector:
    matchLabels:
      app: canary-demo
  template:
    metadata:
      labels:
        app: canary-demo
    spec:
      containers:
        - name: canary-demo
          image: argoproj/rollouts-demo:blue
          imagePullPolicy: Always
          ports:
            - name: http
              containerPort: 8080
              protocol: TCP
          resources:
            requests:
              memory: 32Mi
              cpu: 5m
  strategy:
    canary:
      canaryService: canary-demo-canary
      stableService: canary-demo
      canaryMetadata:
        labels:
          deployment: canary
      stableMetadata:
        labels:
          deployment: stable
      trafficRouting:
        nginx:
          stableIngress: canary-demo
          additionalIngressAnnotations:
            canary-by-header: X-Canary
      steps:
        - setWeight: 20
        - pause: {}
        - setWeight: 50
        - pause:
            duration: 30s
        - setWeight: 70
        - pause:
            duration: 30s
然后,将它应用到集群内。
$ kubectl apply -f canary-rollout.yaml
rollout.argoproj.io/canary-demo created
在上面这段 Rollout 对象中,spec.template 字段和 Deployment 工作负载的字段定义是一致的,在这里,我们使用了 argoproj/rollouts-demo:blue 镜像来创建生产环境的工作负载,并定义了 strategy.canary 字段,它代表使用金丝雀发布的策略。其他的字段我也简单介绍一下。
canaryService 表示金丝雀 Service 的名称,我们会在稍后创建它。
stableService 表示生产环境 Service 的名称,同样也需要在稍后创建。
canaryMetadata 和 stableMetadata 字段表示在金丝雀发布时,会将额外的标签增加到 Pod 中,它可以区分不同环境的 Pod。
trafficRouting.nginx 字段表示使用 Ingress-Nginx 来管理流量,同时,trafficRouting.nginx.stableIngress 字段用来指定 Ingress 名称,这个 Ingress 需要我们提前创建。
trafficRouting.nginx.additionalIngressAnnotations 字段用来配置特定的金丝雀流量识别策略,这里的含义是当请求头出现 X-Canary 时,就将流量转发到金丝雀环境中。
此外,还有一项重要的配置:canary.steps,它是用来描述如何进行自动化金丝雀发布。
在这个例子中,自动化金丝雀的配置如下。
- 将金丝雀环境的流量比例配置为 20%。
- 暂停金丝雀发布,直到手动批准。
- 将金丝雀环境的流量比例配置为 50%,并持续 30 秒。
- 将金丝雀环境的流量比例配置为 70%,并持续 30 秒。
- 完成金丝雀发布,此时金丝雀环境成为新的生产环境,并接收所有的生产流量。
创建 Service 和 Ingress 对象
接下来,我们还需要创建 Service 和 Ingress 对象。首先创建用于生产环境的 canary-demo 和金丝雀环境的 canary-demo-canary Service 对象,将下面的内容保存为 canary-demo-service.yaml 文件。
apiVersion: v1
kind: Service
metadata:
  name: canary-demo
  labels:
    app: canary-demo
spec:
  ports:
  - port: 80
    targetPort: http
    protocol: TCP
    name: http
  selector:
    app: canary-demo
---
apiVersion: v1
kind: Service
metadata:
  name: canary-demo-canary
  labels:
    app: canary-demo
spec:
  ports:
  - port: 80
    targetPort: http
    protocol: TCP
    name: http
  selector:
    app: canary-demo
然后,将它应用到集群内。
$ kubectl apply -f canary-demo-service.yaml
service/canary-demo created
service/canary-demo-canary created
最后,创建 Ingress 对象。将下面内容保存为 canary-demo-ingress.yaml 文件。
apiVersion: networking.k8s.io/v1
kind: Ingress
metadata:
  name: canary-demo
  labels:
    app: canary-demo
  annotations:
    cert-manager.io/cluster-issuer: letsencrypt-prod
    kubernetes.io/ingress.class: "nginx"
spec:
  rules:
    - host: "canary-auto-in-k8s.cheverjohn.me"
      http:
        paths:
          - path: /
            pathType: Prefix
            backend:
              service:
                name: canary-demo
                port:
                  name: http
  tls:
    - hosts:
        - canary-auto-in-k8s.cheverjohn.me
      secretName: canary-auto-in-k8s-tls
  ingressClassName: "nginx"
在这里,我们把 canary.auto 作为生产环境和金丝雀环境的域名,并且将后端 Service 配置为 canary-demo。
使用 kubectl apply 命令将它应用到集群内。
$ kubectl apply -f canary-demo-ingress.yaml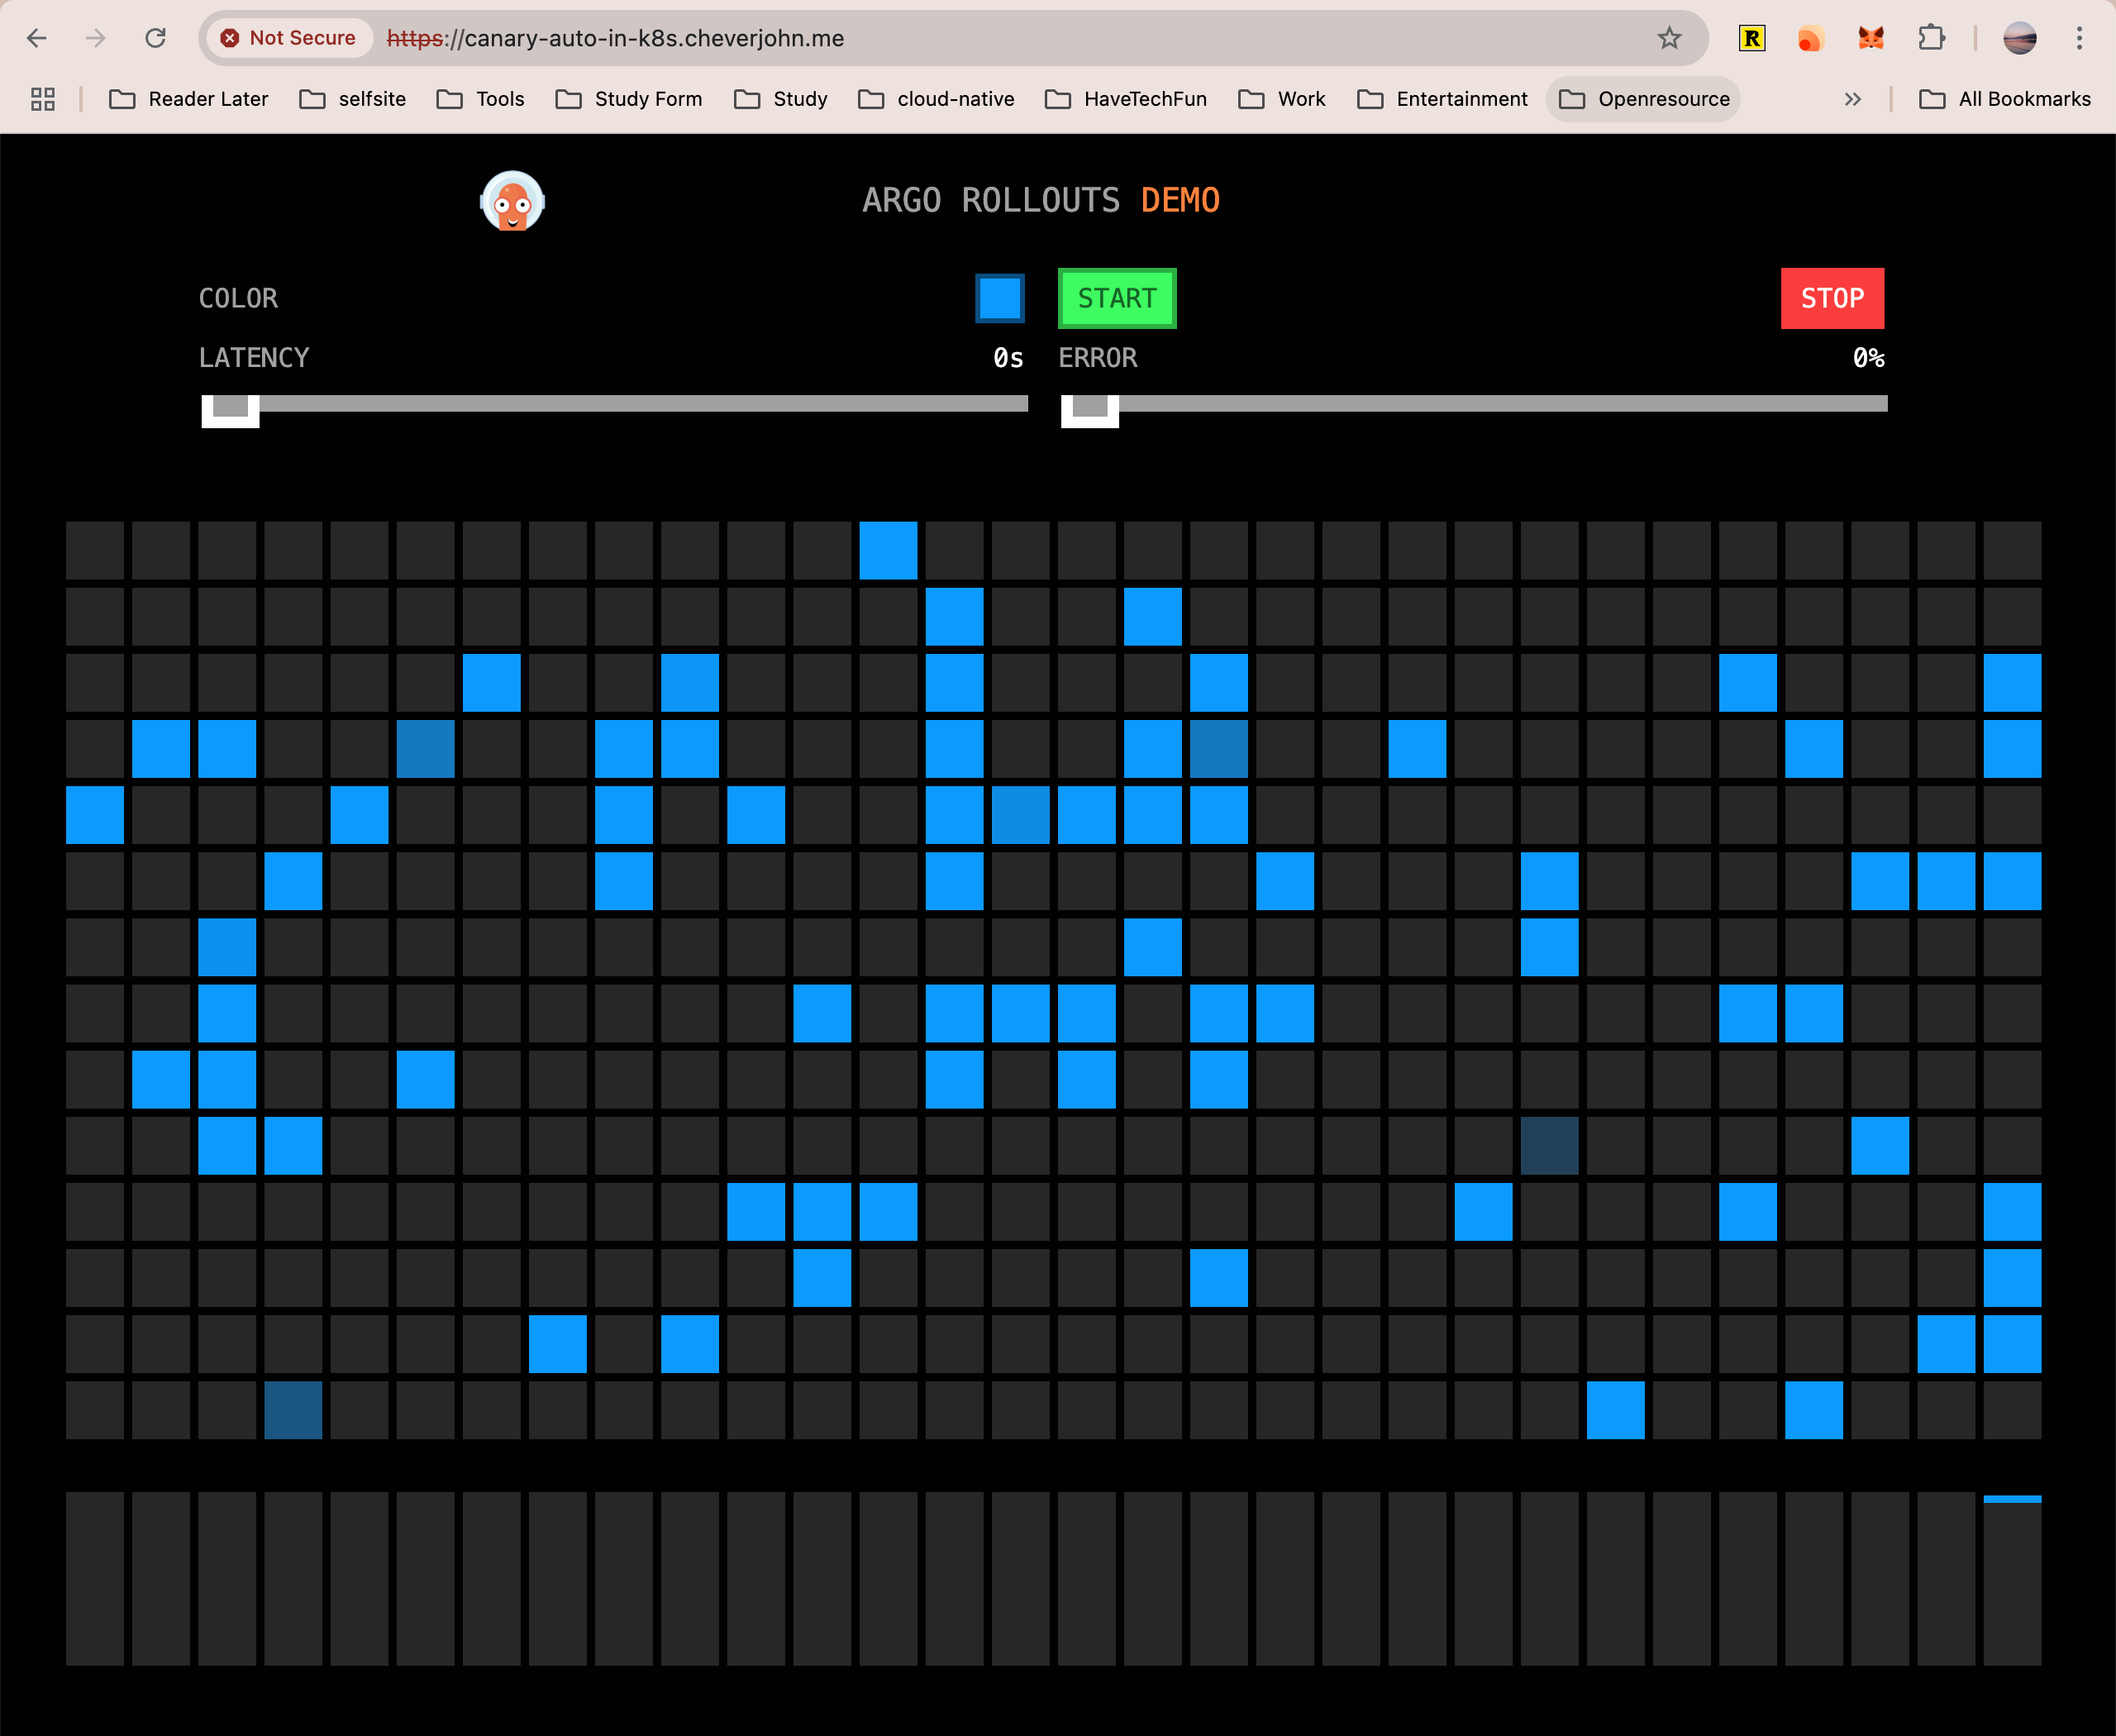
ingress.networking.k8s.io/canary-demo created访问地址,效果如下:
金丝雀发布自动化
现在,我们已经创建好了生产环境。接下来,我们继续进行自动化的金丝雀发布。
假设我们需要更新生产环境,并需要将生产环境的 argoproj/rollouts-demo:blue 镜像更新为 argoproj/rollouts-demo:green 镜像。此时,你只需要修改 Rollout 对象的 image 字段,将 blue 修改为 green 即可。
containers:
- name: canary-demo
  image: argoproj/rollouts-demo:green
然后,使用 kubectl apply 将 Rollout 对象重新应用到集群内。
$ kubectl apply -f canary-rollout.yaml
rollout.argoproj.io/canary-demo configured
现在,返回浏览器,等待十几秒后,你应该能看到代表金丝雀环境的绿色方块开始出现,并大致占到总请求数的 20%,如下图右下角所示。
同时,我们在 Rollout 对象中还配置了 canary-by-header 参数,所以当我们使用特定的 Header 请求时,流量将被转发到金丝雀环境中,你可以使用 curl 来验证。
$ for i in `seq 1 10`; do curl -H "X-Canary: always" https://canary-auto-in-k8s.cheverjohn.me/; done
"green""green""green""green""green""green""green""green""green""green"
从上面的请求命令我们会发现,当 Header 中携带了 X-Canary: always 之后,将返回 green 字符串,也就是金丝雀环境的 green 镜像。
到这里,自动金丝雀发布的第一阶段就已经完成了。接下来,我们结合 Argo Rollout Dashboard,继续进行自动金丝雀发布剩下的阶段。
访问 Argo Rollout Dashboard
要访问 Argo Rollout Dashboard,你需要先安装 Argo Rollout kubectl 插件。
接下来,我们可以使用 kubectl argo rollouts dashboard 来启用 Dashboard。
$ kubectl argo rollouts dashboard
INFO[0000] Argo Rollouts Dashboard is now available at http://localhost:3100/rollouts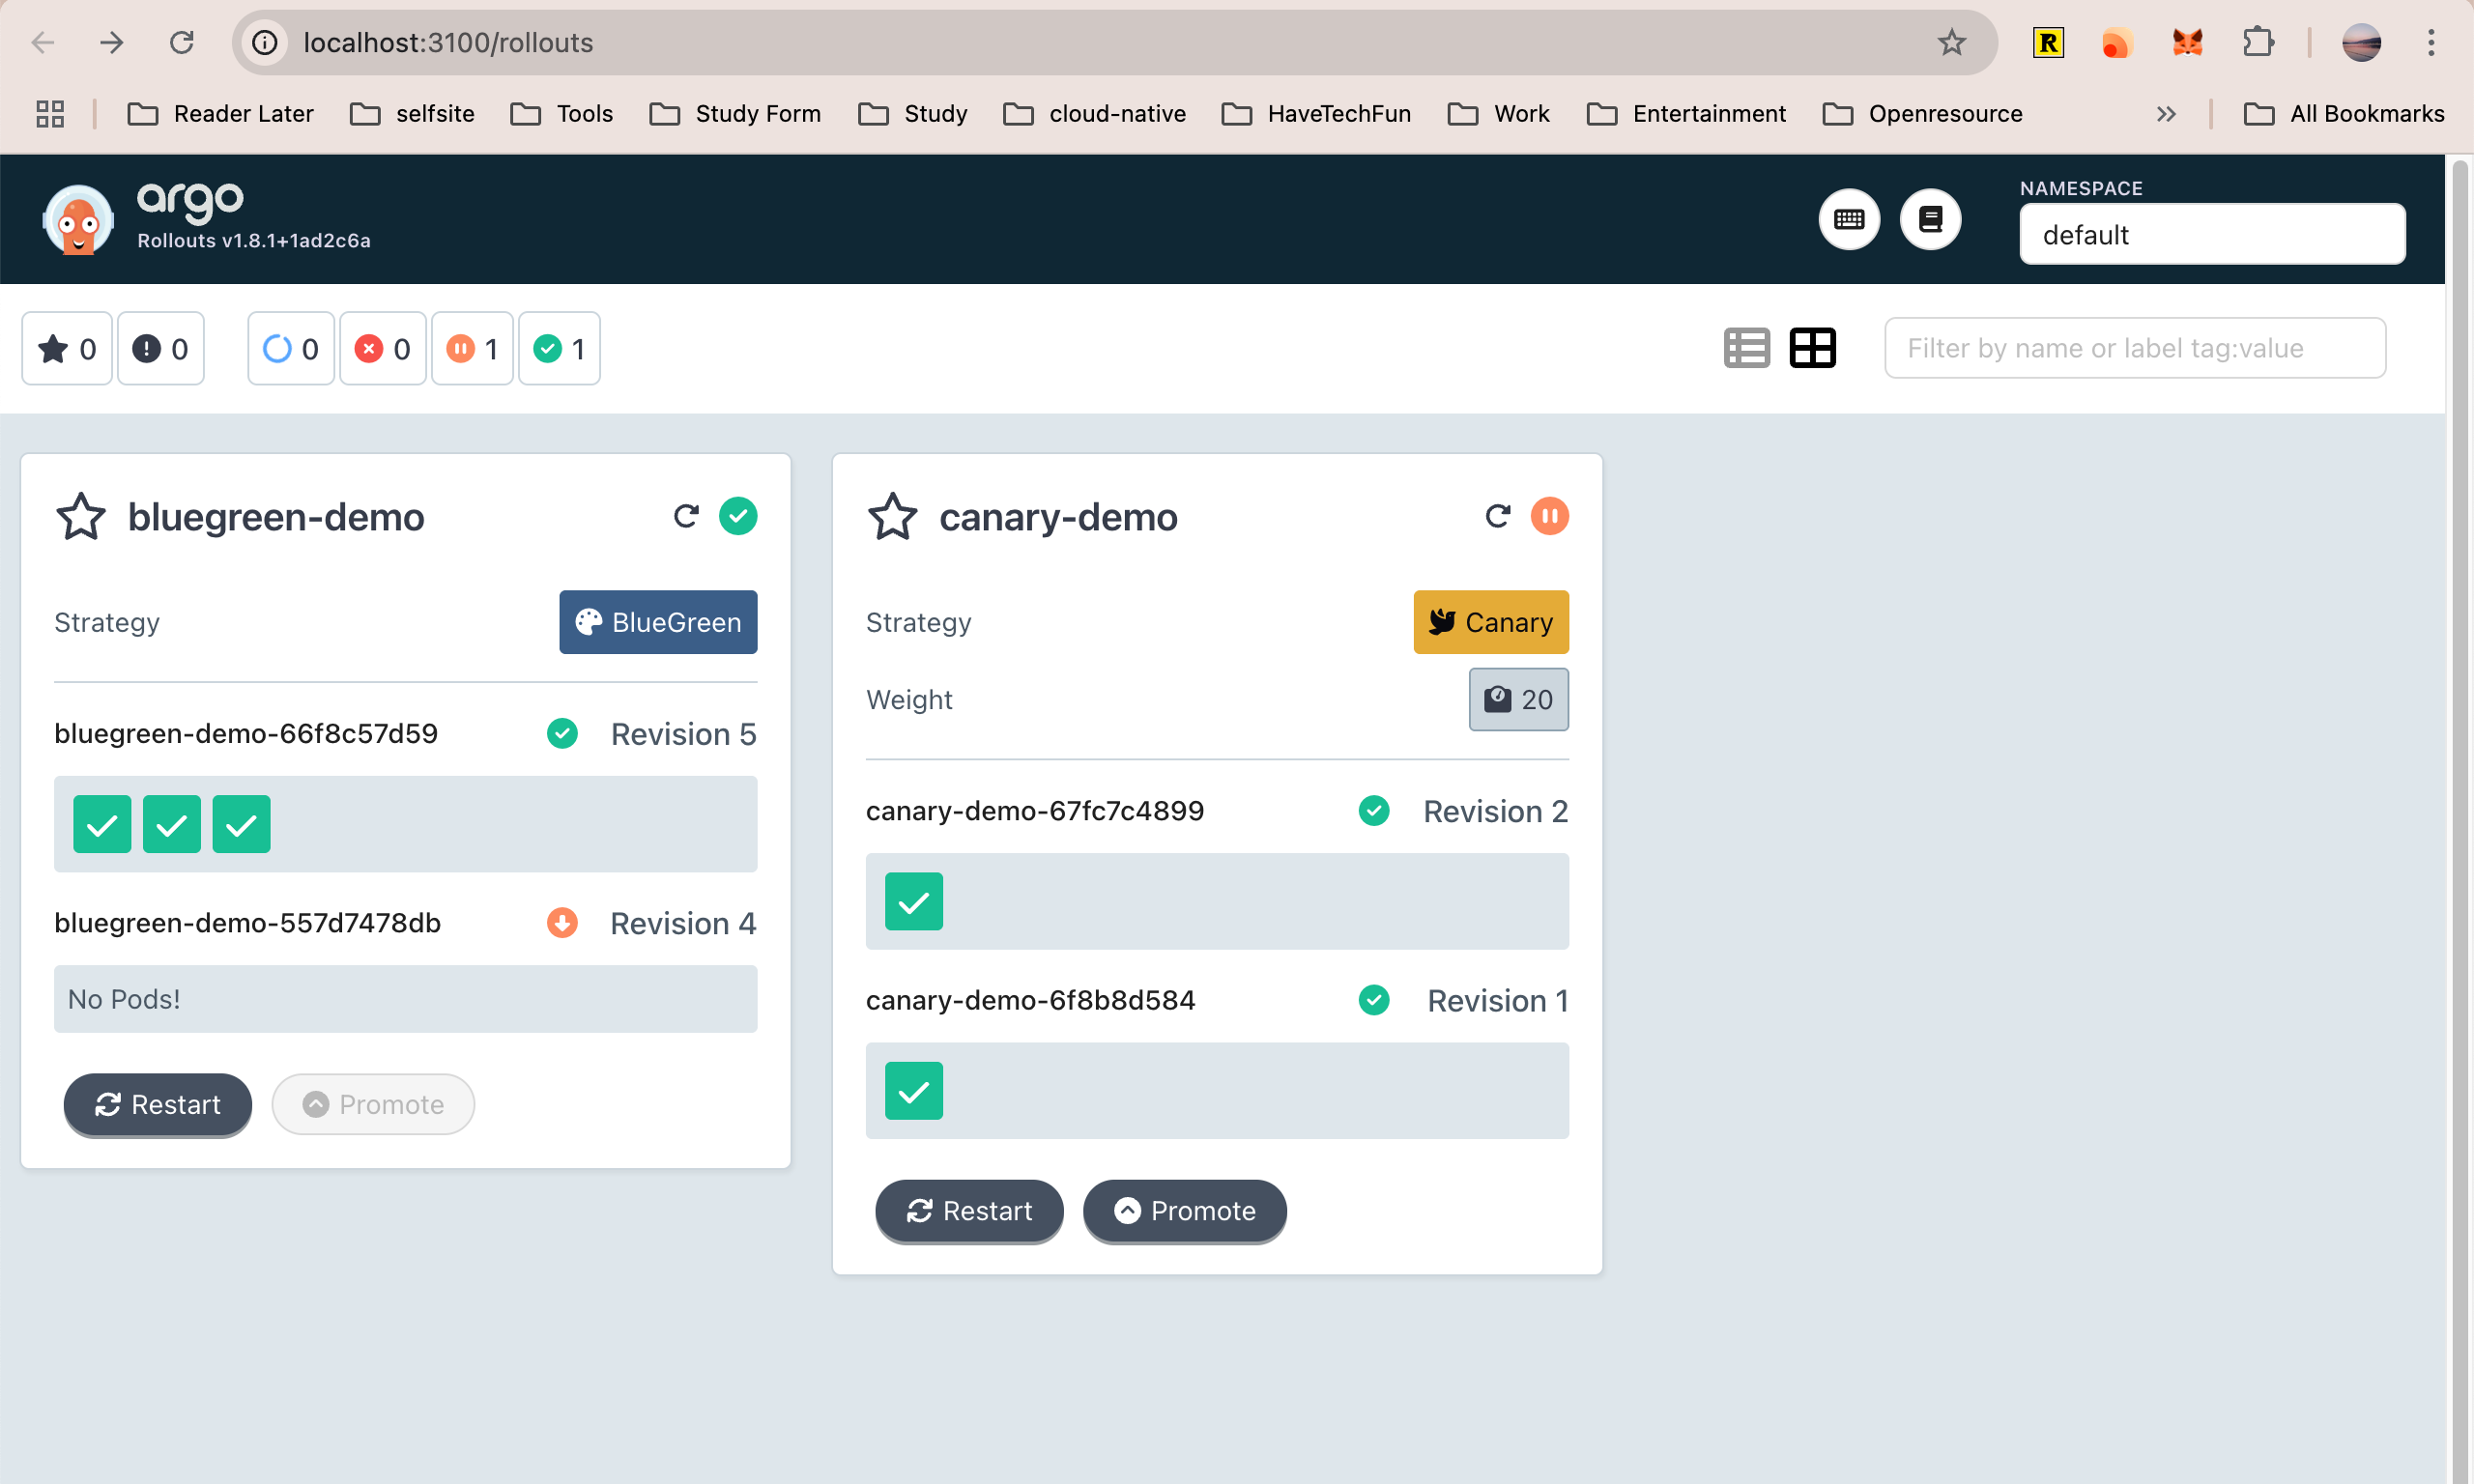
接下来,点击卡片进入 canary-demo 详情,在这里我们将看到金丝雀发布的完整步骤以及当前所处的阶段。
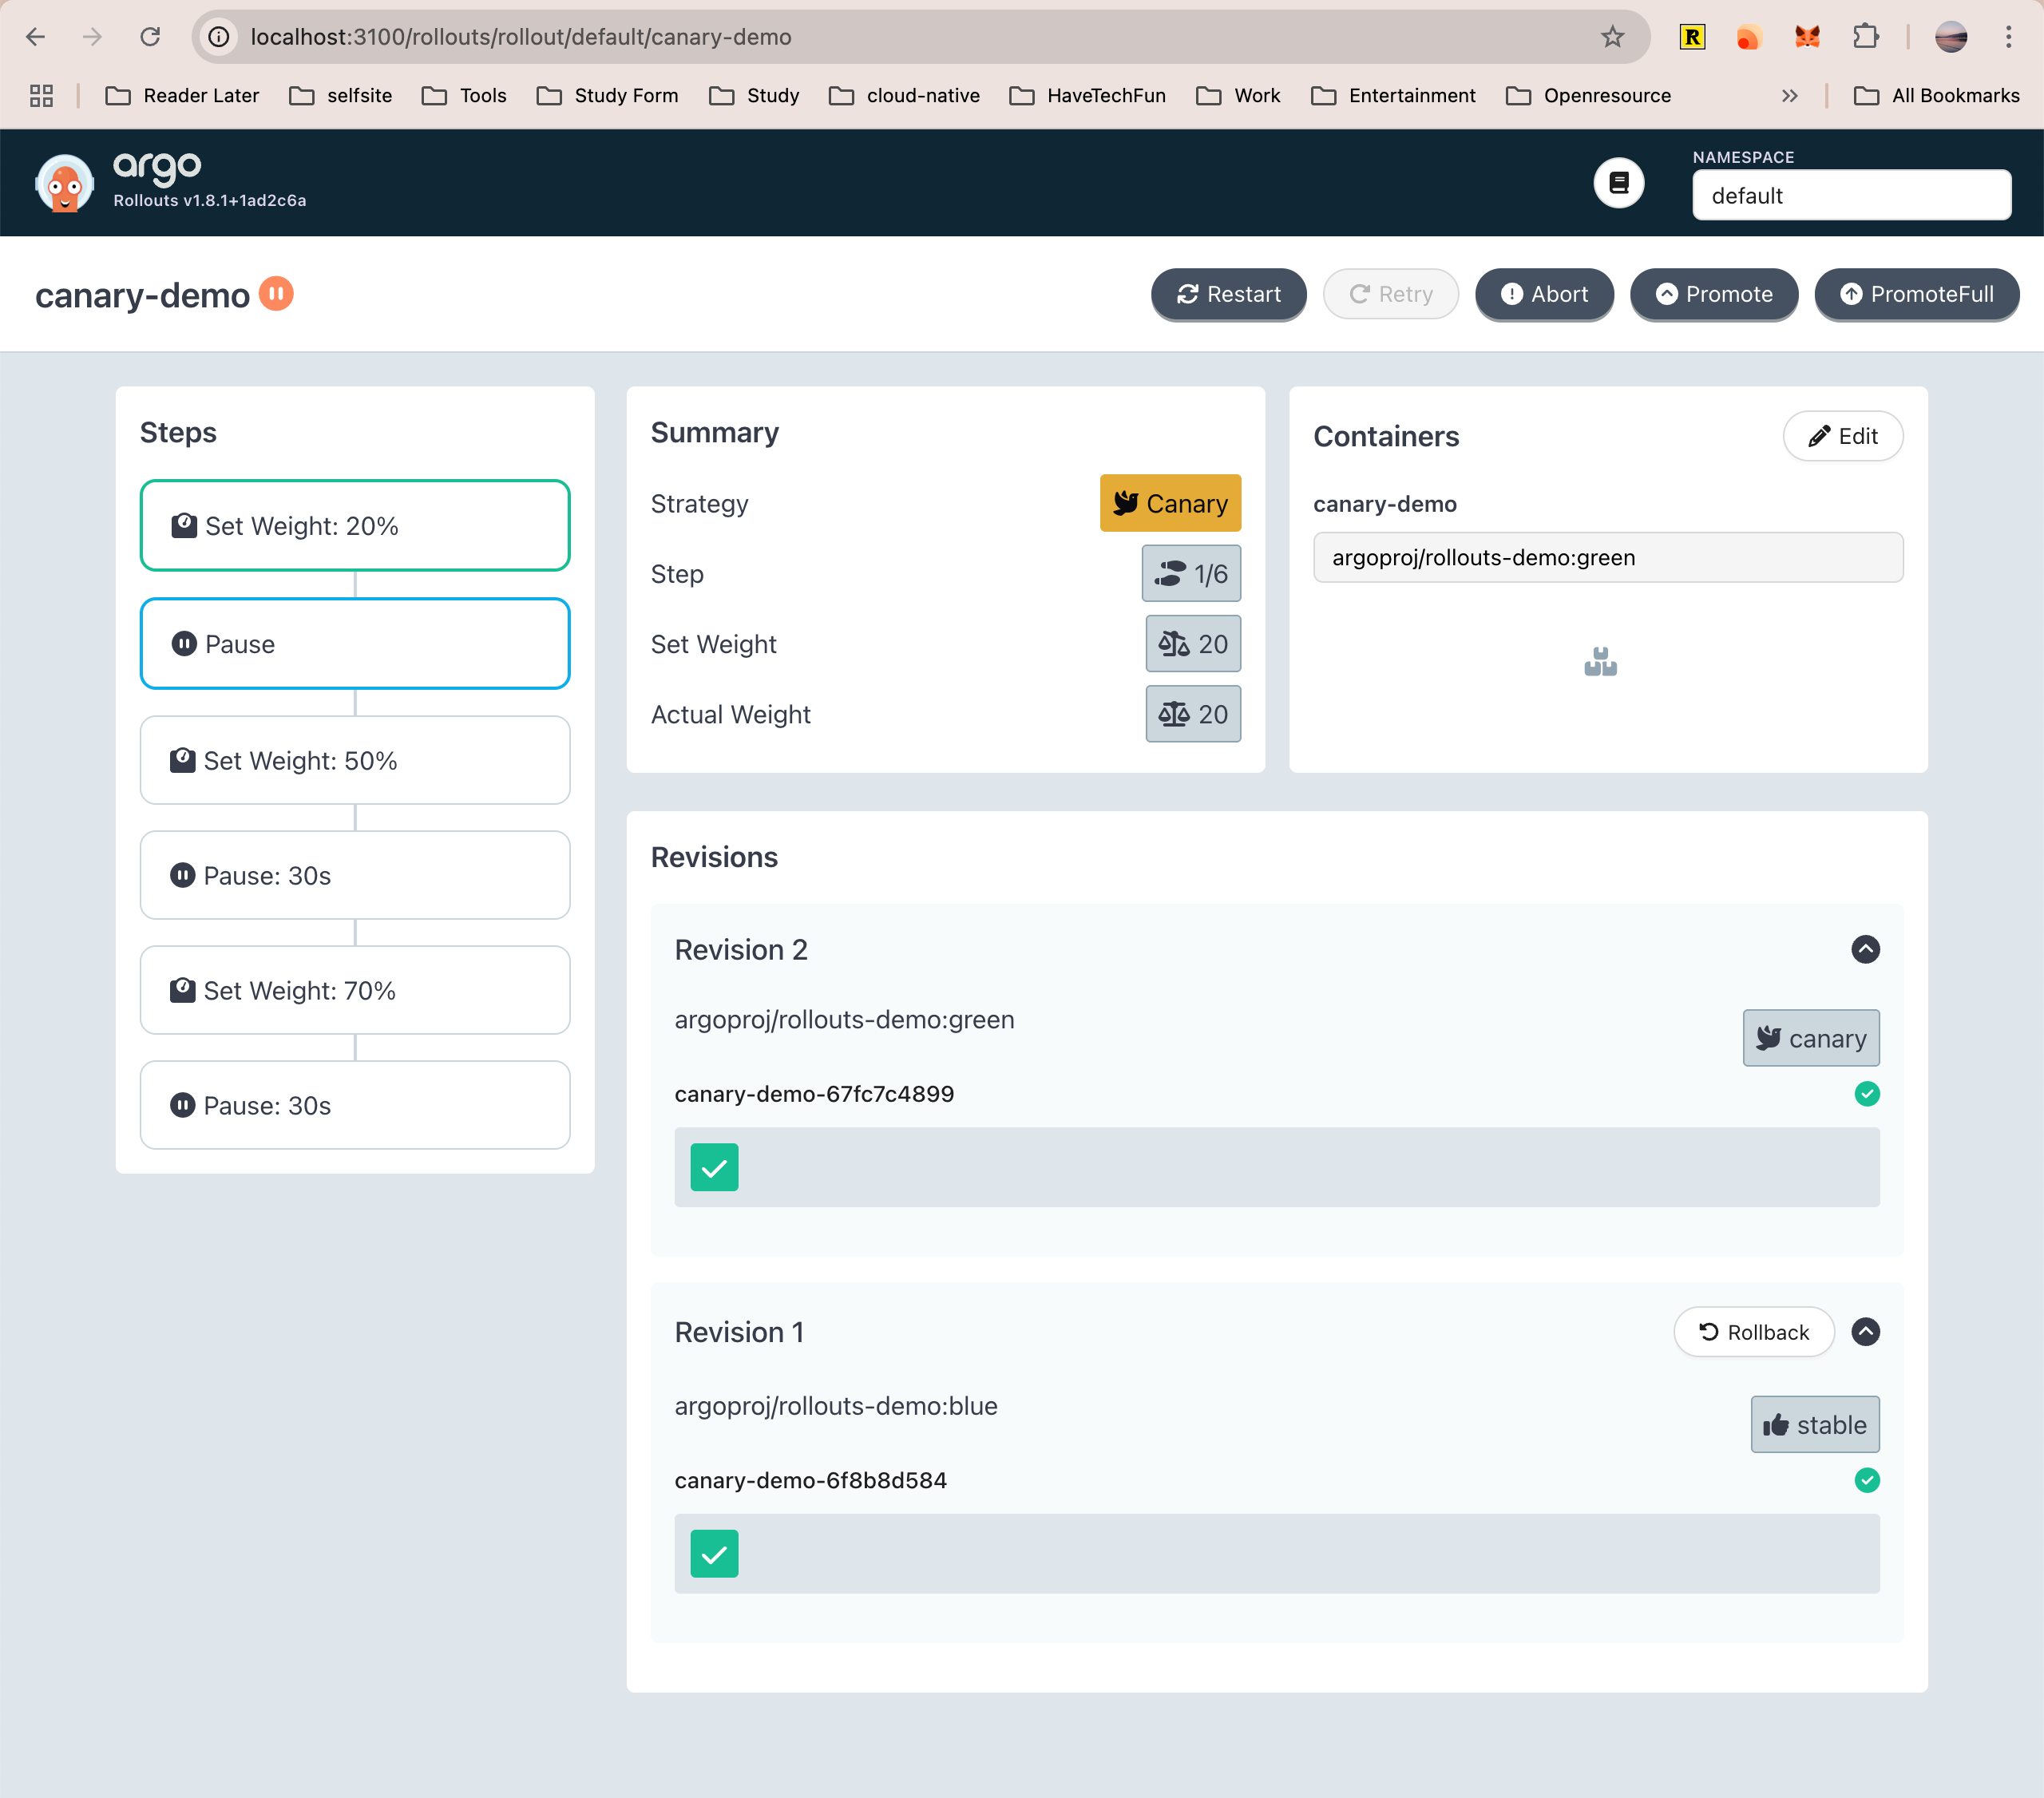
从上面的截图我们可以看出,金丝雀发布一共有 6 个阶段,当前处于第二个暂停阶段,这和我们在 Rollout 里的定义是一致的。
接下来,我们通过手动批准的方式让金丝雀发布进入下一个步骤。你可以使用 kubectl argo rollouts promote 命令来让金丝雀发布继续运行。
$ kubectl argo rollouts promote canary-demo
rollout 'canary-demo' promoted
之后,金丝雀发布将会按照我们预定的步骤运行。首先将金丝雀环境的流量比例设置为 50%,停留 30 秒,然后将金丝雀环境的流量比例设置为 70%,再停留 30 秒,最后将金丝雀环境提升为生产环境。当金丝雀发布完成之后,Argo Rollout 将同时自动对老的环境进行缩容操作,如下图所示。
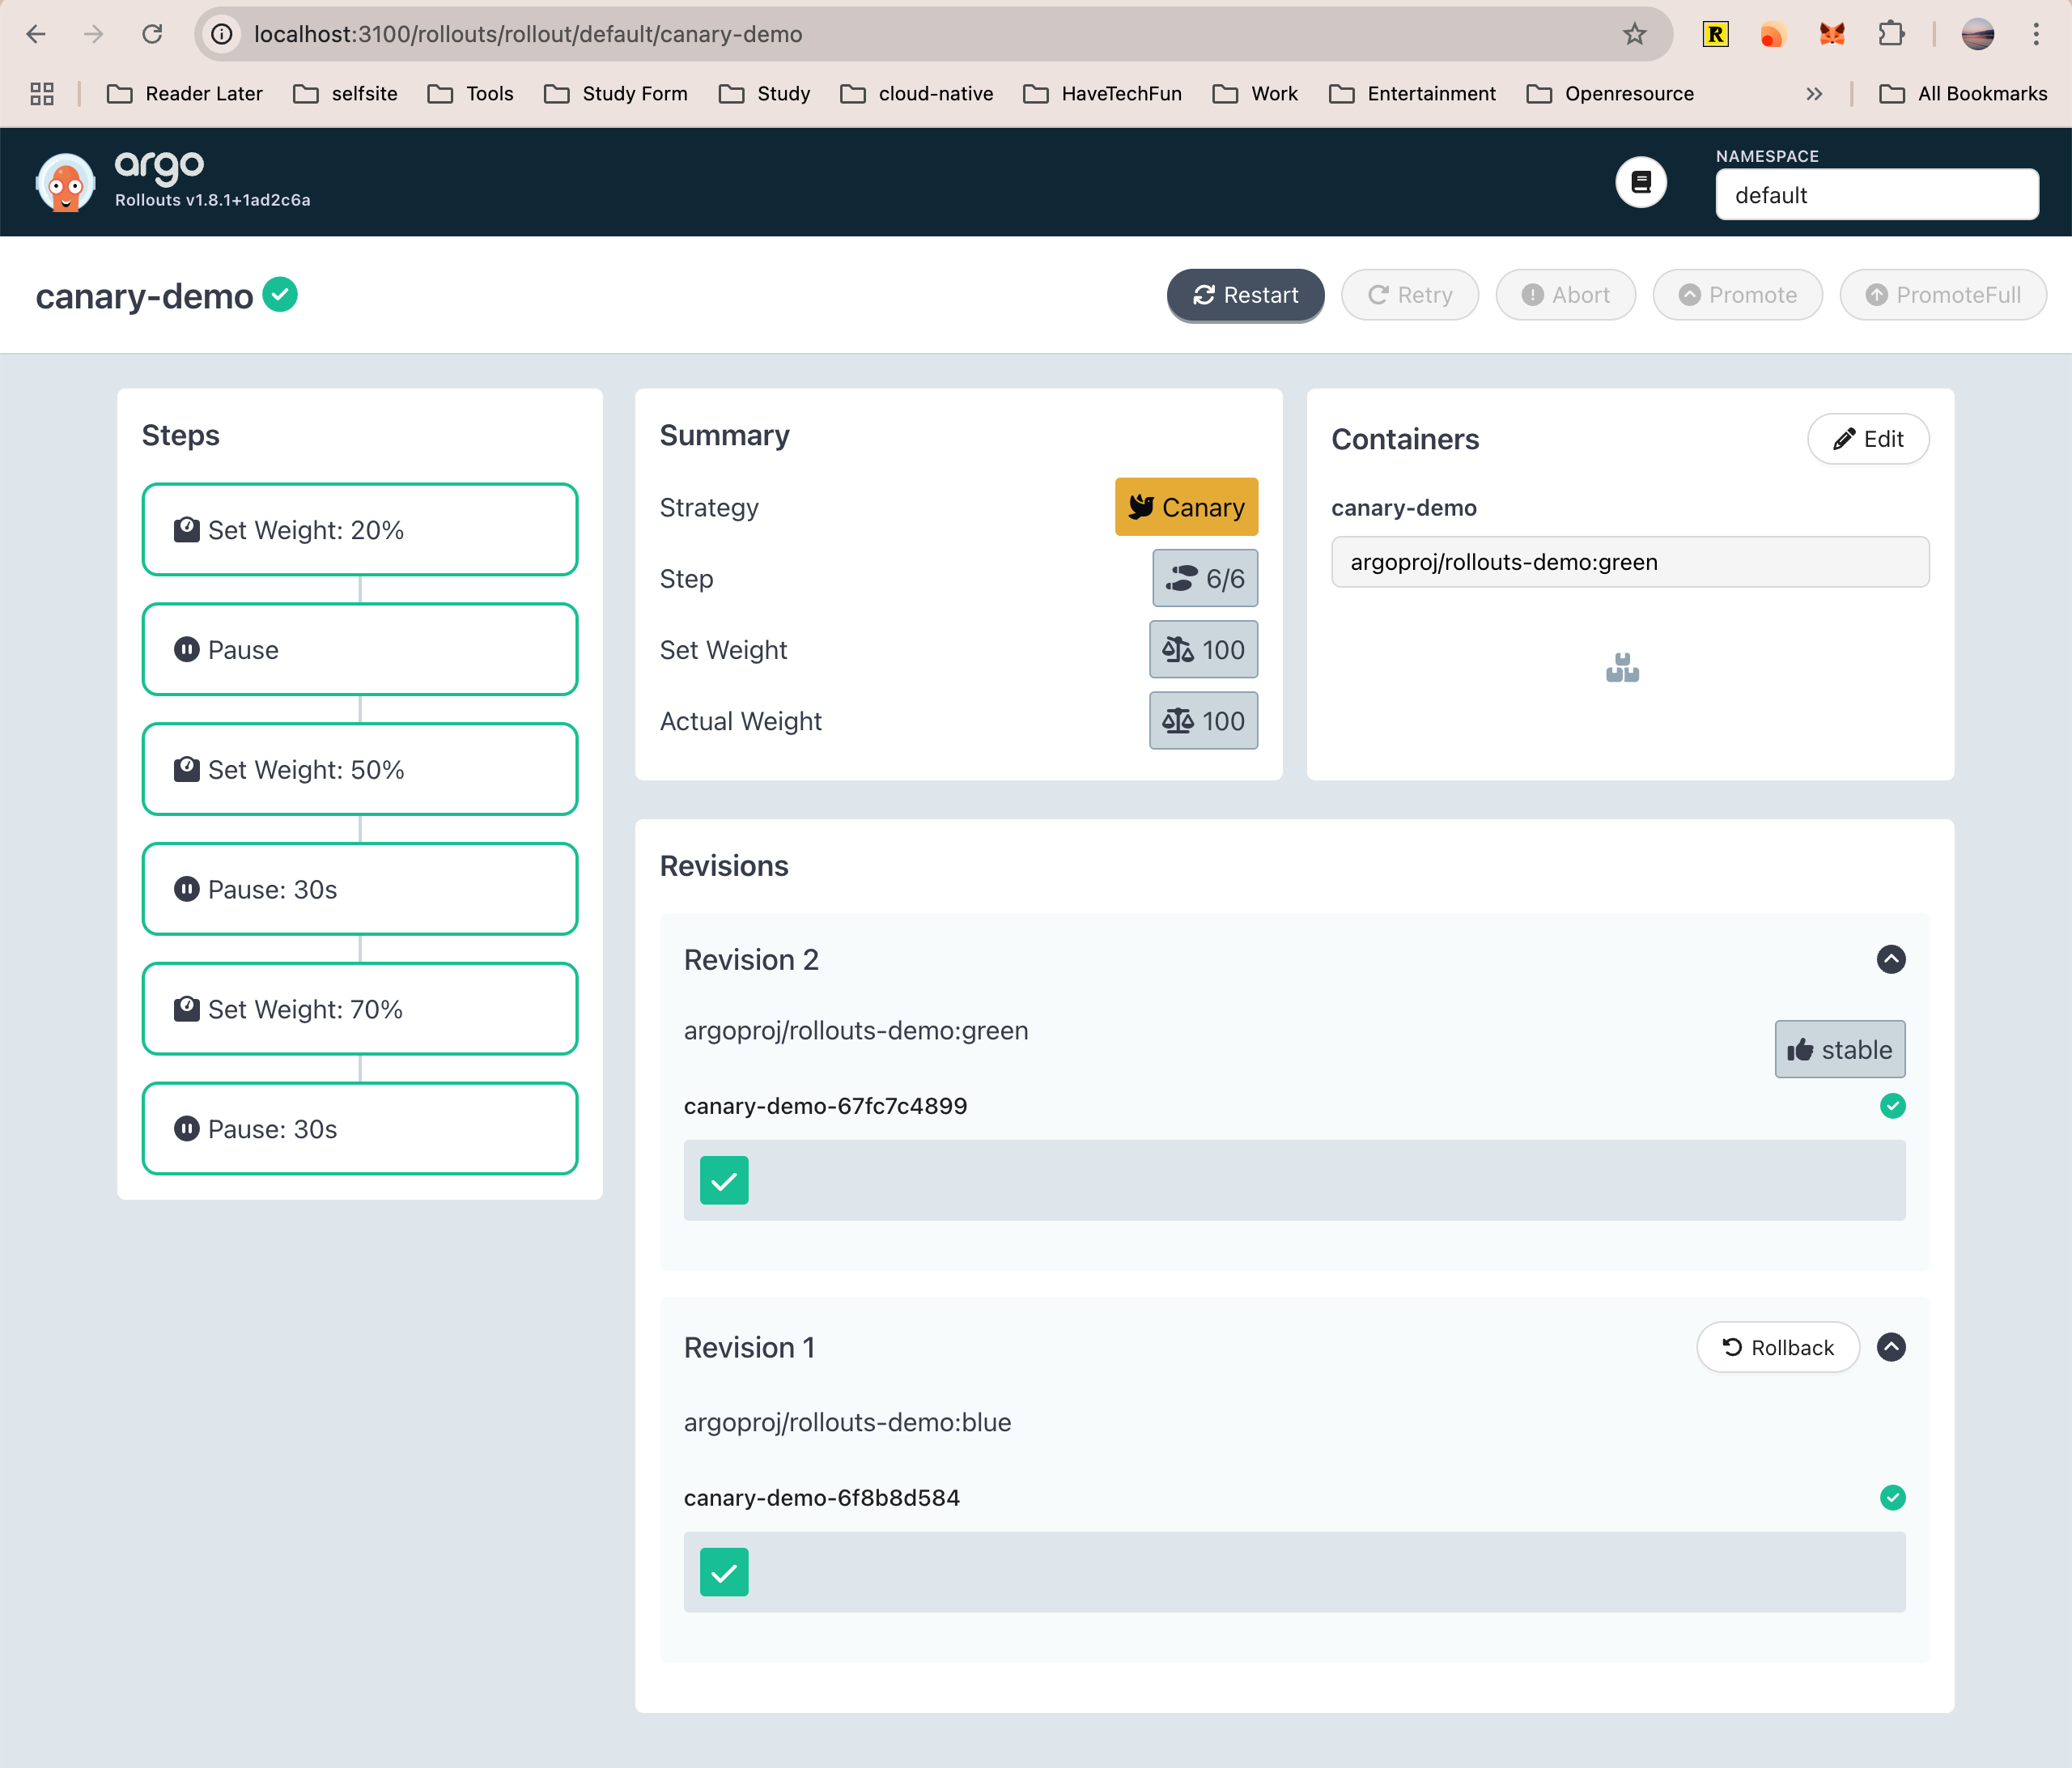
到这里,一次完整的自动化金丝雀发布就已经完成了。
自动化原理
Argo Rollout 实际上是在不同的金丝雀发布阶段,通过修改 ReplicaSet、Service 和 Ingress 对象来实现自动化的。
在刚开始创建生产环境时,Ingress、Service 和 Rollout 对象的关系如下图所示。
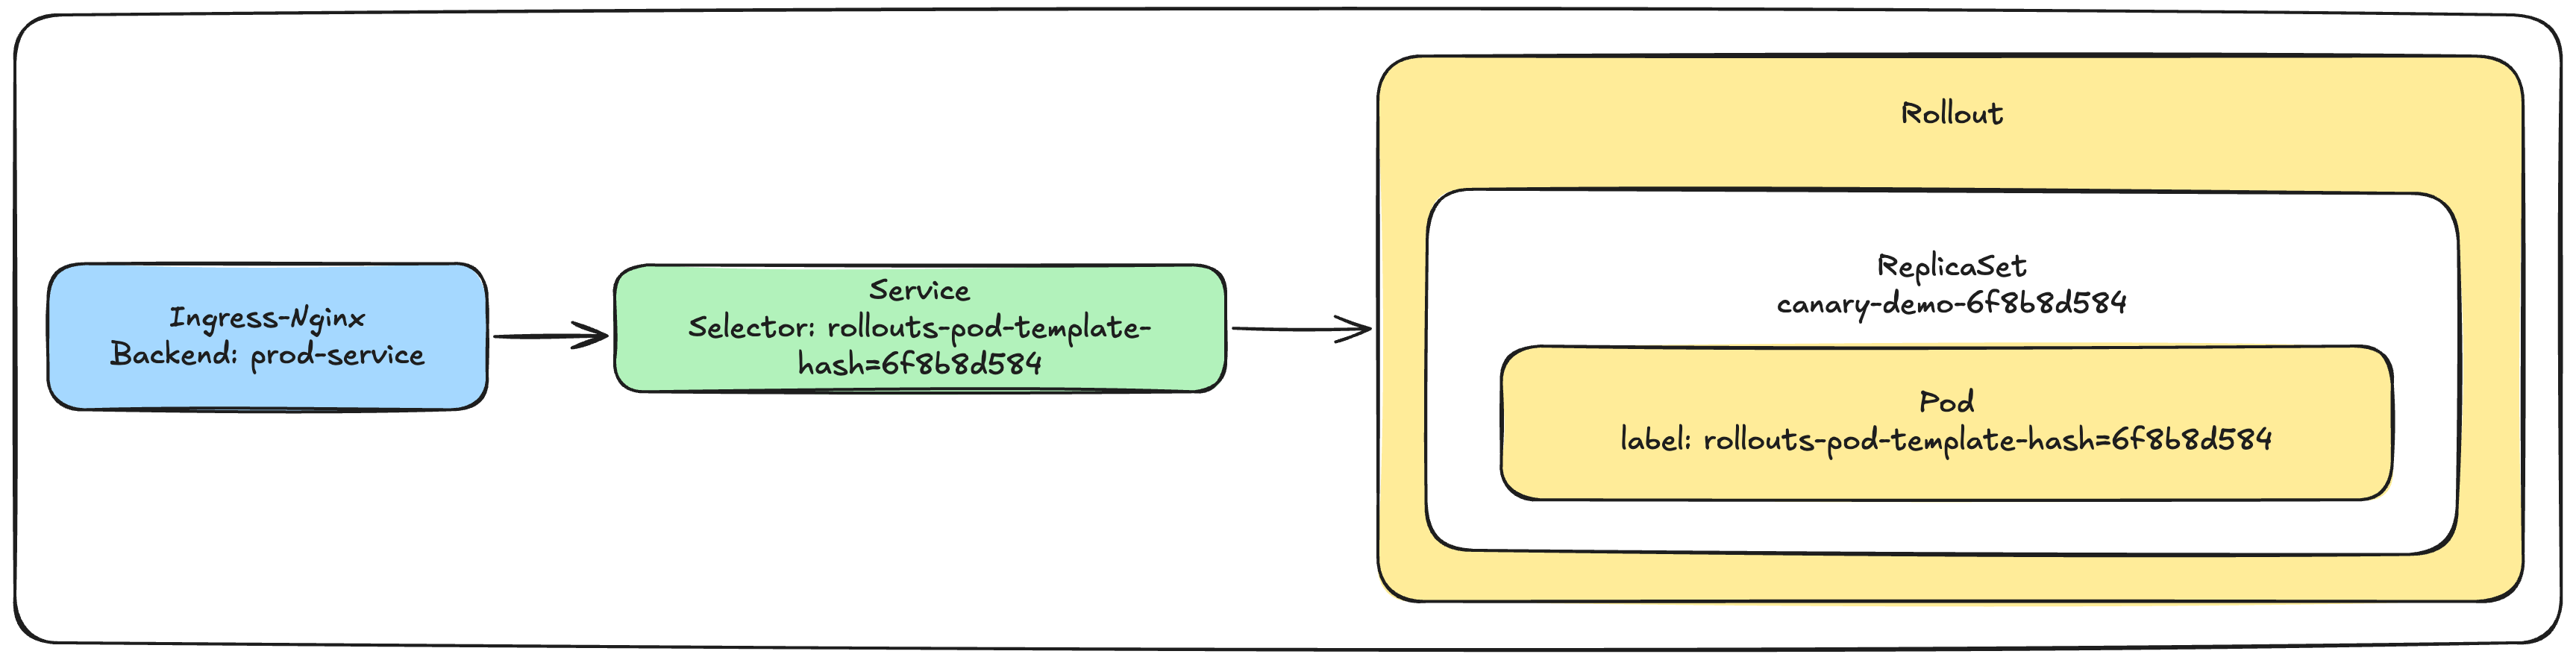
上面的这条流量链路比较简单,首先,最外层 Ingress 在接收到流量后会将其转发到生产环境的 Service,Service 又通过选择器来匹配被 Rollout 对象管理的 Pod。
当我们修改了 Rollout 的镜像版本并进行金丝雀发布时,Rollout 对象会创建一个新的金丝雀环境的 ReplicaSet 对象,并修改 Service 的标签选择器来匹配到金丝雀环境的 Pod。然后,再生成一个额外的 Ingress 对象来匹配需要转发到金丝雀环境的流量,包括按权重以及匹配 Header 的规则,如下图所示。
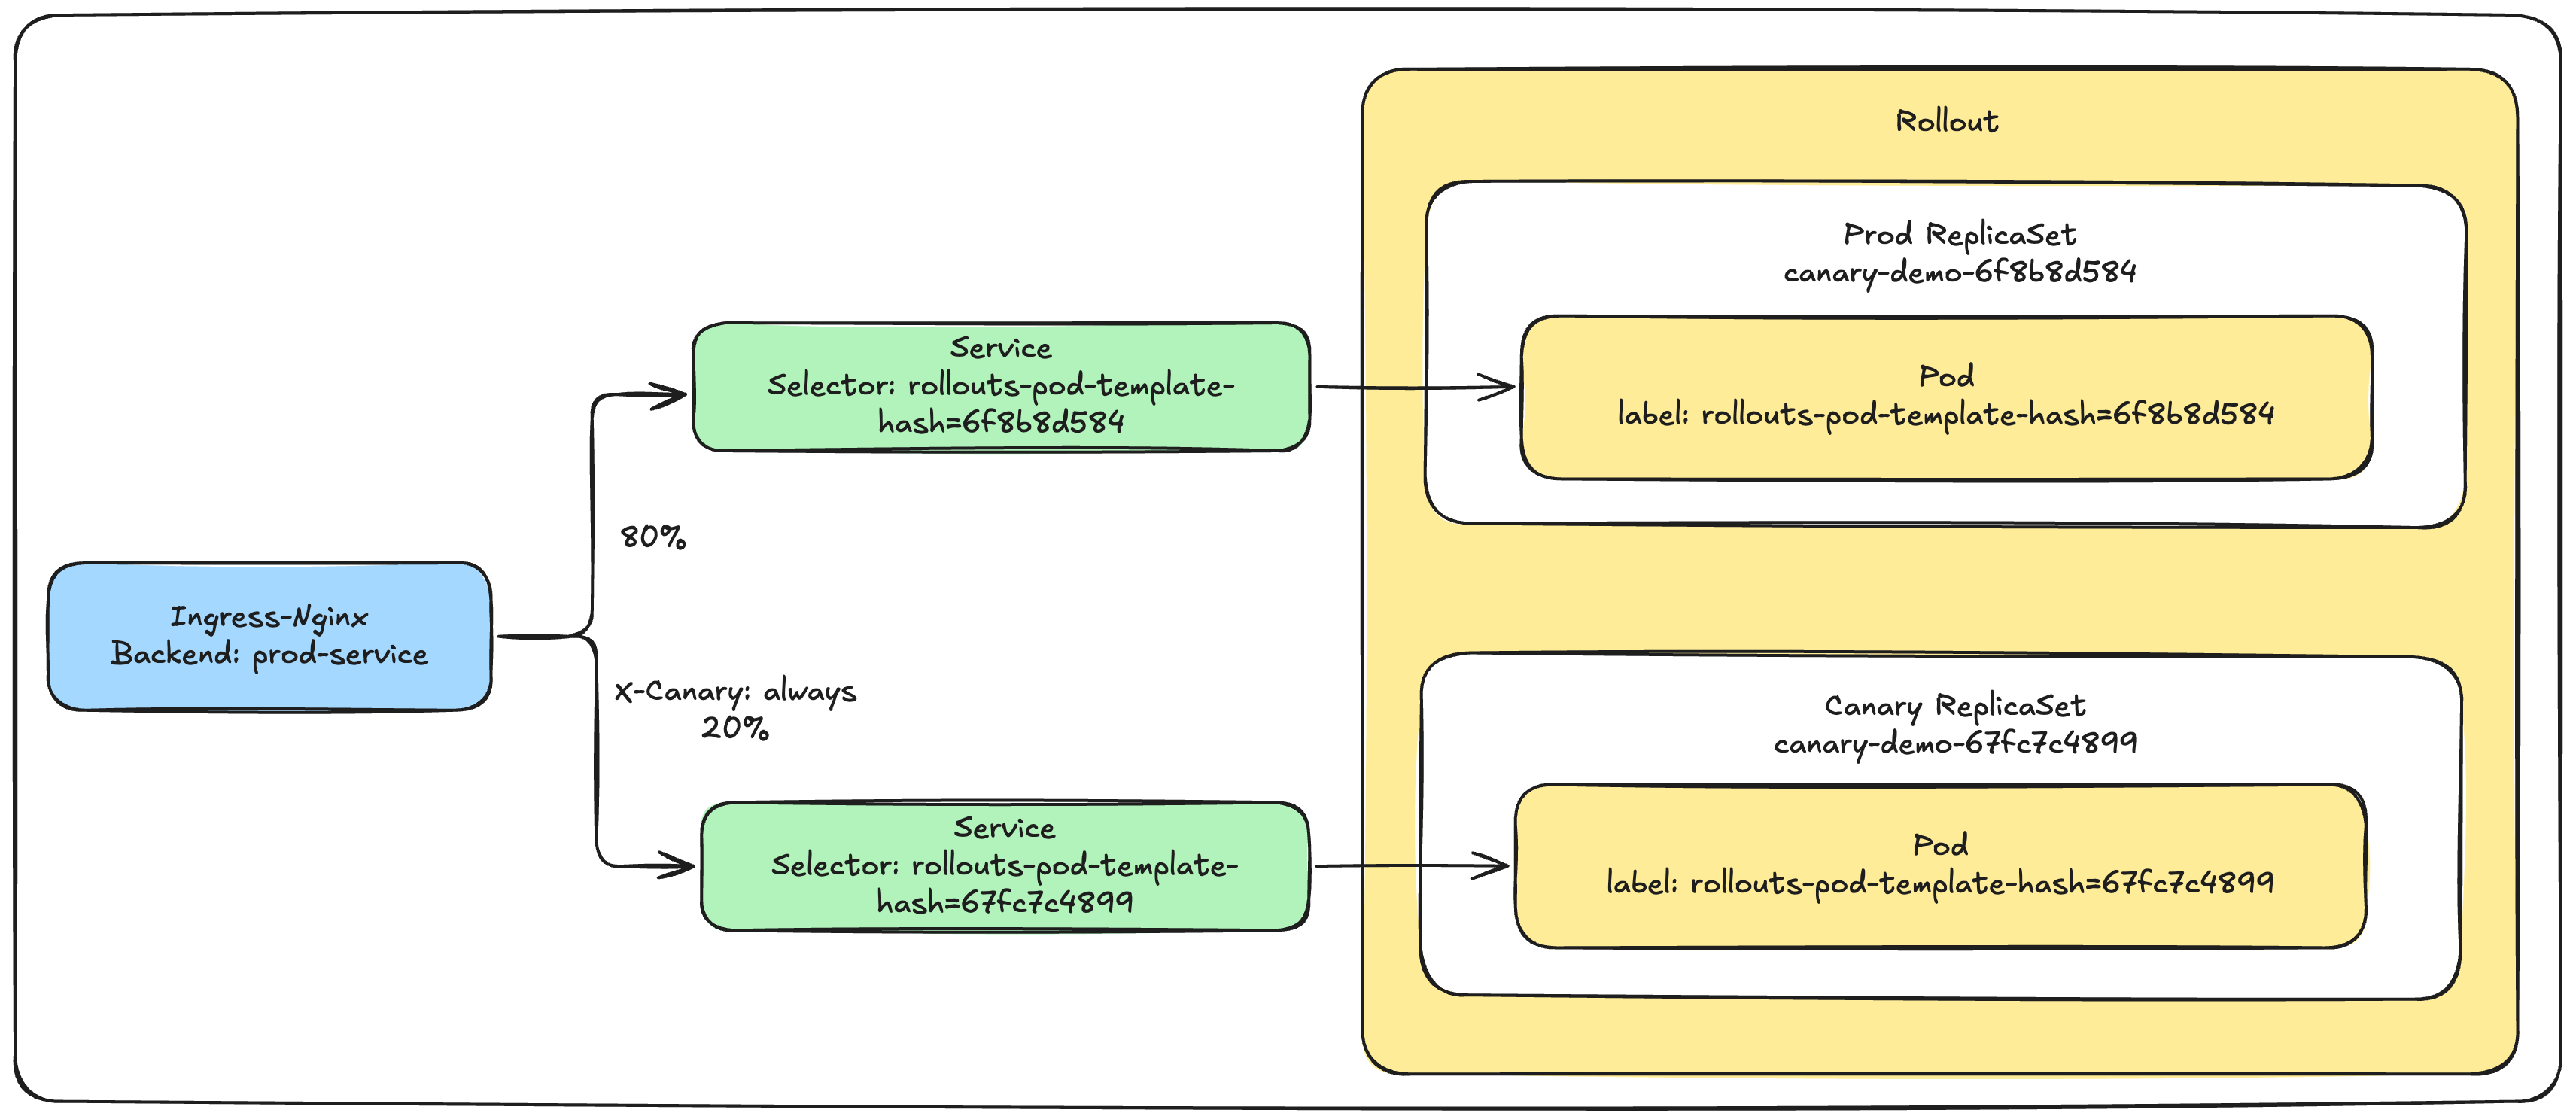
当处于不同的金丝雀阶段时,Argo Rollout 会自动修改 Ingress 对象的 nginx.ingress.kubernetes.io/canary-weight 注解的值,以此来控制不同比例的流量进入金丝雀环境。
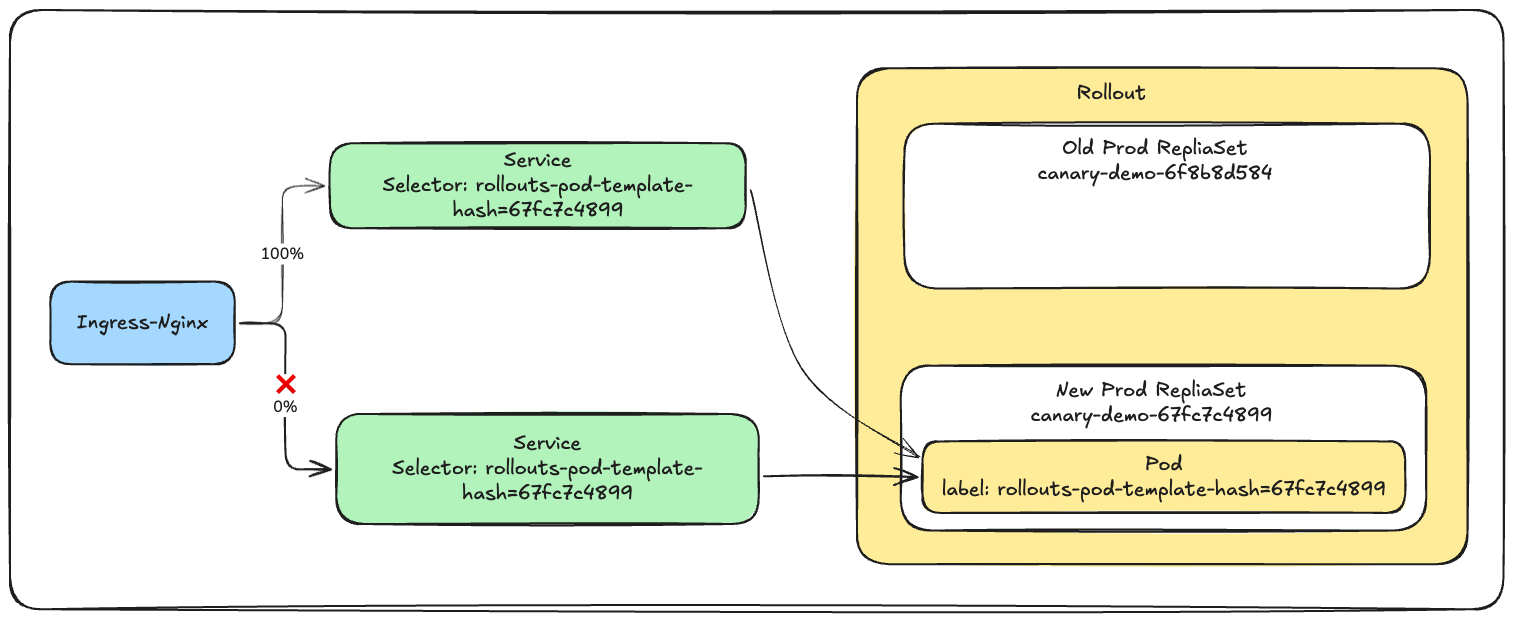
最后,当金丝雀发布的所有阶段都完成之后,Argo Rollout 还会自动将金丝雀环境提升为生产环境。具体的做法是,修改金丝雀环境的 Ingress 策略,将 nginx.ingress.kubernetes.io/canary-weight 注解的值修改为 0,同时将旧生产环境的 Service 的选择器修改为匹配金丝雀环境的 Pod,最后再将旧的生产环境的 ReplicaSet 缩容为 0,达到将金丝雀环境提升为生产环境的目的,如下图所示。
总结
这节课,我为你介绍了什么是金丝雀发布以及如何通过手动的方式来实践它。它和蓝绿发布有一点类似,比如在发布过程都需要同时部署两套环境。不同的是,金丝雀发布的核心是通过为 Ingress-Nginx 添加注解来实现的。
在金丝雀发布的过程中,主要有两种流量分发方式。第一种是通过流量的比例进行分发,第二种是通过特定的 Header 来识别。
以手动的方式来实施金丝雀部署比较繁琐,并且效率低下。所以,我们还介绍了如何通过 Argo Rollout 来自动化金丝雀发布过程。
通过 Rollout 对象,我们可以把金丝雀发布的过程完整地定义出来,比如将金丝雀发布分成若干个阶段,每个阶段使用不同的流量比例并且持续不同的时间。同时,还可以为金丝雀发布配置手动确认的过程。
在实际的业务场景中,通常我们会尽量拉长金丝雀发布的时间,比如持续数小时渐进式地发布,以便更多的流量流向金丝雀环境。其次,通过特定的 Header 来识别流量是一种非常好的工程实践,比如你可以将特定地域、性别、年龄的用户作为目标群体来进行金丝雀发布,让特定的用户才能访问新的版本。如果你仔细留意过,会发现自己在使用一些大型应用的时候,很可能都作为“灰度”用户曾经参与了金丝雀发布过程。
最后,要在 GitOps 实践金丝雀发布也非常容易,你只需要将工作负载的 Kind 和 apiVersion 字段分别修改成 Rollout 和 argoproj.io/v1alpha1 就可以了。结合 ArgoCD,你就可以很方便地在 GitOps 工作流中使用金丝雀发布了。