Kubernetes Bootstrap Cheatsheets(v1.32.0)
- [Before Deploy Kubernetes](#Before Deploy Kubernetes)
- [Disable Swap](#Disable Swap)
Before Deploy Kubernetes
Prior to kubernetes deployment, establishing a robust and reproducible foundation requires meticulous preparation. This includes defining a precise deployment strategy and specifying the hardware profile of the target nodes. These preliminary steps are crucial for ensuring a stable and predictable deployment process.
There are some angles to keep in mind:
- Plan Cluster Node;
- Swap must be disabled;
- Time must be adjusted to be consistent;
- Kernel params must be adjusted.
- [Setup Login Other Node From Master Node without Password](#Setup Login Other Node From Master Node without Password)
- [Plan Cluster Node](#Plan Cluster Node)
- [Time must be adjusted to be consistent](#Time must be adjusted to be consistent)
- [Disable Swap](#Disable Swap)
- [Configure Kernel Params](#Configure Kernel Params)
Setup Login Other Node From Master Node without Password
If not specified otherwise, all operations in this document are performed on the k8s-master-01 node, followed by remote distribution of files and execution of commands. Therefore, it’s necessary to add SSH trust relationships from this node to all other nodes.
The sshd_config file must contain the following settings:
#LoginGraceTime 2m
PermitRootLogin yes
#PermitRootLogin prohibit-password
#StrictModes yes
#MaxAuthTries 6
Configure passwordless SSH login for the root account on k8s-master-01 to all other nodes.
ssh-keygen -t rsa
ssh-copy-id root@k8s-master-01
ssh-copy-id root@k8s-slave-01
ssh-copy-id root@k8s-slave-02
And must confirm file authority:
root@k8s-slave-01:~# chmod 700 .ssh
root@k8s-slave-01:~# cd .ssh
root@k8s-slave-01:~/.ssh# ls
authorized_keys
root@k8s-slave-01:~/.ssh#
root@k8s-slave-01:~/.ssh# chmod 600 authorized_keys
command as following:
chmod 700 .ssh
cd .ssh
chmod 600 authorized_keys
Plan Cluster Node
In this section, you must specify the hostname information for the cluster (this can be used later for inter-node trust operations, such as sshing the master node to the slave node). And the whole things that must be done as following:
- Config hostname infomation;
- Add node trust relationship;
- Setup system timezone and sync the time;
mac address generator to create 3 mac address.
Create environment.sh File
And create environment.sh, file content as follows link.
Create some related Dir
Command as follows, run following command in all nodes:
mkdir -p  /opt/k8s/{bin,work} /etc/{kubernetes,etcd}/cert
sudo chown -R cheverjohn:cheverjohn /opt/k8s
sudo chown -R cheverjohn:cheverjohn /etc/*
Distribute cluster configuration script
Environment variables used later are defined in the file environment.sh. Please modify it according to your machine and network settings. Then, copy it to the /opt/k8s/bin directory on all nodes.
source environment.sh
for node_ip in ${NODE_IPS[@]}
  do
    echo ">>> ${node_ip}"
    scp environment.sh root@${node_ip}:/opt/k8s/bin/
    ssh root@${node_ip} "chmod +x /opt/k8s/bin/*"
  done
Time must be adjusted to be consistent
Use chrony to sync system time.
-
Update software list and install chrony:
sudo apt update sudo apt install chrony -y -
Config the chrony: save following scripts as
update-chrony.sh:#!/bin/bash # backup sudo cp /etc/chrony/chrony.conf /etc/chrony/chrony.conf.bak # comment all lines which contain 'pool' sed -i 's/^pool/#pool/' /etc/chrony/chrony.conf # add new pool config cat << EOF >> /etc/chrony/chrony.conf pool ntp.sg.net iburst pool time.asia.apple.com iburst pool time.google.com iburst EOF # setup the timezone sudo timedatectl set-timezone Asia/Singapore # restart chronyd service sudo systemctl restart chronyd sudo systemctl enable chrony # check the chrony status and sync the time timedatectl status chronyc sources -
Enabling both
timesyncdandchronycreates a conflict. They are mutually exclusive. Please disabletimesyncd:sudo timedatectl set-ntp false
Disable Swap
Swap is a mechanism in Linux systems that allows a portion of hard drive space to be used as virtual memory. When the system’s physical memory(RAM) is in sufficient, inactive memory pages are moved to the swap partition or swap file, freeing up physical memory for active processes.
In Kubernetes deployments, it’s generally recommended to disable swap primarily for the following reasons:
- Performance: Swap read/write speeds are significantly slower than RAM. Frequent swap usage by Kubernetes nodes can lead to noticeable application performance degradation, impacting the overall cluster performance and responsiveness. Kubernetes is designed to ensure pod performance, and swap can severely hinder this. 1, 2
- Predictability: Kubernetes uses QoS (Quality of Service) to manage pod resource allocation and prioritization. Enabling swap adds complexity and unpredictability to node resource management, as it becomes difficult to accurately assess swap usage and its impact on pod performance. 2
- Stability: When both physical memory and swap space are exhausted on a node, the OOM (Out of Memory) killer might be triggered, forcibly terminating processes to free up memory. This can lead to unexpected pod terminations, affecting application stability. Disabling swap provides a clearer picture of memory pressure, facilitating Kubernetes resource management and scheduling. 2
- Support for New Features: Kubernetes 1.22 introduced alpha support for swap, which has been further refined and moved to beta in subsequent releases. 4 This indicates that Kubernetes is exploring more sophisticated swap management approaches rather than simply disabling it.
While disabling swap is generally recommended, enabling it might be a considered trade-off in specific scenarios, such as resource-constrained edge devices or testing environments. 5 If swap is enabled, careful configuration of relevant Kubernetes parameters, such as --fail-swap-on, is crucial to ensure cluster stability and performance. 4
How to disable swap:
You can temporarily disable swap using the command swapoff -a. To permanently disable swap, modify the /etc/fstab file, commenting out or removing the entry containing the swap partition or swap file.
Comands as follows:
#!/bin/bash

# Temporarily disable swap
sudo swapoff -a

# Comment out the swap entry in /etc/fstab
sudo sed -i '/ swap / s/^/#/' /etc/fstab
sudo sed -i '/swap/s/^/#/' /etc/fstab


# Verify that swap is disabled
free -h
Save as disable_swap.sh and run it.
This script first temporarily disables swap, then comments out the corresponding swap entry in the /etc/fstab file, and finally verifies that swap is disabled. Please adapt the script to your specific environment.
In summary, while Kubernetes has begun to support swap, it’s generally still recommended to disable it in production environments to ensure cluster performance, predictability, and stability. You should carefully consider your specific needs and environment when making configuration decisions.
sudo systemctl daemon-reloadand following command:
sudo mount -aBoth sudo systemctl daemon-reload and sudo mount -a are related to system configuration and can seem similar, but they serve distinct purposes:
sudo systemctl daemon-reload: This command reloads the systemd manager configuration. It instructs systemd to reread its unit files (which define services, timers, mounts, etc.) and regenerate its internal dependency tree. Crucially, it does not restart any running services. It simply makes systemd aware of any changes you’ve made to unit files, so that those changes will be applied the next time you start, stop, or restart a service. Think of it as refreshing systemd’s understanding of what services are available and how they’re configured. 1235sudo mount -a: This command mounts all filesystems listed in/etc/fstab./etc/fstab(filesystem table) defines which filesystems should be mounted, where they should be mounted, and with what options. Runningmount -aeffectively applies the configuration specified in/etc/fstab. This is typically done during system boot, but you can also run it manually if you’ve made changes to/etc/fstab. It’s important to note thatmount -awill attempt to mount all entries in/etc/fstab, so if there are any errors in your/etc/fstabfile,mount -amay fail. 46
In the context of removing a swap entry from /etc/fstab, sudo systemctl daemon-reload is not strictly necessary. Since swap is managed by the kernel and not by systemd, changes to swap configuration in /etc/fstab don’t require a systemd reload. However, some systemd units might have dependencies on swap, and daemon-reload can ensure that systemd is aware of the change. sudo mount -a is more directly relevant, as it will remount the filesystems based on the updated /etc/fstab, effectively applying the swap removal. Alternatively, you can use swapoff -a to deactivate all swap devices immediately without needing to remount.
Configure Kernel Params
cat <<EOF | sudo tee /etc/modules-load.d/containerd.conf
overlay
br_netfilter
EOF

sudo modprobe overlay
sudo modprobe br_netfilter

# Setup required sysctl params, these persist across reboots.
cat <<EOF | sudo tee /etc/sysctl.d/99-kubernetes-cri.conf
net.bridge.bridge-nf-call-iptables  = 1
net.ipv4.ip_forward                 = 1
net.bridge.bridge-nf-call-ip6tables = 1
EOF

# Apply sysctl params without reboot
sudo sysctl --system
The commands configure the system for Kubernetes and containerization by ensuring the necessary kernel modules and network settings are in place. Let’s look at the purpose of each component and the files as a whole:
/etc/modules-load.d/containerd.conf: This file ensures that theoverlayandbr_netfiltermodules are loaded at boot time. This is crucial for containerization and Kubernetes networking.overlay: Provides the OverlayFS filesystem, essential for efficient container image layering and volume management. It allows changes within a container to be isolated from the underlying host filesystem, improving performance and security.br_netfilter: Enables communication between container networks and the host network by allowing traffic to be filtered and manipulated by iptables/ip6tables rules. This is fundamental for Kubernetes networking features like NetworkPolicies and Services.
/etc/sysctl.d/99-kubernetes-cri.conf: This file configures kernel parameters related to networking, specifically for container runtimes and Kubernetes.net.bridge.bridge-nf-call-iptables = 1: Allows iptables rules to affect traffic traversing bridge networks. This is essential for Kubernetes to manage and control network traffic between pods and the outside world using IPv4.net.ipv4.ip_forward = 1: Enables the host machine to forward IPv4 traffic between network interfaces, acting as a router. This is critical for pod-to-pod communication and for pods to access external networks.net.bridge.bridge-nf-call-ip6tables = 1: The IPv6 equivalent ofnet.bridge.bridge-nf-call-iptables, allowing ip6tables rules to affect traffic on bridge networks. This ensures Kubernetes networking features work correctly with IPv6.
sudo modprobe overlay&sudo modprobe br_netfilter: These commands load the specified modules immediately, making the changes effective without requiring a reboot. This is useful for applying the configuration without interrupting running services.sudo sysctl --system: This command applies the sysctl settings from the configuration files in/etc/sysctl.d/immediately, ensuring the networking parameters are active without a reboot.
In essence, these commands and files work together to set up the core kernel-level requirements for running containers and Kubernetes. They enable container image management, network connectivity, and traffic control, forming the foundation for a functional containerized environment. 1 2
Install Container Runtime
According to this url.
You will install containerd and runc. Containerd can be likened to the management system of a container factory. It’s responsible for receiving orders (container creation requests), scheduling resources (CPU, memory, storage), and managing the production process (container lifecycle). Runc, on the other hand, is like the assembly line worker in the factory, responsible for taking the raw materials (container images) and assembling them into finished products (running containers) according to the OCI specifications.
Step 1: Installing containerd
Download the containerd-<VERSIOPN>-<OS>-<ARCH>.tar.gz, command as following:
wget https://github.com/containerd/containerd/releases/download/v2.0.2/containerd-2.0.2-linux-amd64.tar.gzThen extract it under /usr/local:
sudo tar Cxzvf /usr/local containerd-2.0.2-linux-amd64.tar.gzsystemd
If you intend to start containerd via systemd, you should also download the containerd.service unit file from https://raw.githubusercontent.com/containerd/containerd/main/containerd.service into /usr/local/lib/systemd/system/containerd.service, and run the following commands:
sudo mkdir -p /usr/local/lib/systemd/system/
sudo curl -fL https://raw.githubusercontent.com/containerd/containerd/main/containerd.service -o /usr/local/lib/systemd/system/containerd.service
sudo systemctl daemon-reload
Then make it work:
sudo systemctl daemon-reload
sudo systemctl enable --now containerd
Step 2: Installing runc
Download the runc.<ARCH> binary from https://github.com/opencontainers/runc/releases , verify its sha256sum, and install it as /usr/local/sbin/runc.
wget https://github.com/opencontainers/runc/releases/download/v1.2.4/runc.amd64and install it.
sudo install -m 755 runc.amd64 /usr/local/sbin/runcStep 3: Installing CNI plugins
Download the cni-plugins-<OS>-<ARCH>-<VERSION>.tgz archive from https://github.com/containernetworking/plugins/releases , verify its sha256sum, and extract it under /opt/cni/bin:
wget https://github.com/containernetworking/plugins/releases/download/v1.6.2/cni-plugins-linux-amd64-v1.6.2.tgzextract it.
sudo mkdir -p /opt/cni/bin
sudo tar Cxzvf /opt/cni/bin cni-plugins-linux-amd64-v1.6.2.tgz
CRI CLI(crictl)
crictl provides a CLI for CRI-compatible container runtimes. This allows the CRI runtime developers to debug their runtime without needing to set up Kubernetes components.
crictl has been GA since v1.11.0 and is currently under active development. It is hosted at the cri-tools repository. We encourage the CRI developers to report bugs or help extend the coverage by adding more functionalities.
The tool expects JSON or YAML encoded files as input and passes them to the corresponding container runtime using the CRI API protocol.
Install crictl
NOTE: The below steps are based on linux-amd64, however you can get downloads for all other platforms (Windows, ARM, etc) in the releases page.
crictl can be downloaded from cri-tools release page:
- using
wget:
VERSION="v1.32.0" # check latest version in /releases page
wget https://github.com/kubernetes-sigs/cri-tools/releases/download/$VERSION/crictl-$VERSION-linux-amd64.tar.gz
sudo tar zxvf crictl-$VERSION-linux-amd64.tar.gz -C /usr/local/bin
rm -f crictl-$VERSION-linux-amd64.tar.gz- using
curl:
VERSION="v1.32.0" # check latest version in /releases page
curl -L https://github.com/kubernetes-sigs/cri-tools/releases/download/$VERSION/crictl-${VERSION}-linux-amd64.tar.gz --output crictl-${VERSION}-linux-amd64.tar.gz
sudo tar zxvf crictl-$VERSION-linux-amd64.tar.gz -C /usr/local/bin
rm -f crictl-$VERSION-linux-amd64.tar.gz
Create crictl.yaml
sudo tee /etc/crictl.yaml <<EOF
runtime-endpoint: unix:///run/containerd/containerd.sock
image-endpoint: unix:///run/containerd/containerd.sock
timeout: 2
debug: false
pull-image-on-create: false
EOF
Install Kubectl
-
Download the latest release with the command:
curl -LO https://dl.k8s.io/release/v1.32.0/bin/linux/amd64/kubectl -
Verify:
curl -LO "https://dl.k8s.io/release/v1.32.0/bin/linux/amd64/kubectl.sha256" echo "$(cat kubectl.sha256) kubectl" | sha256sum --check -
Install kubectl:
sudo install -o root -g root -m 0755 kubectl /usr/local/bin/kubectl
sudo chmod +x kubectl
mkdir -p ~/.local/bin
mv ./kubectl ~/.local/bin/kubectl
kubectl version --client
Use package management
-
Update
aptpackage index and install packages:sudo apt-get update # apt-transport-https may be a dummy package; if so, you can skip that package sudo apt-get install -y apt-transport-https ca-certificates curl gpg -
Download the public signing key for the Kubernetes package repos:
# If the directory `/etc/apt/keyrings` does not exist, it should be created before the curl command, read the note below. # sudo mkdir -p -m 755 /etc/apt/keyrings curl -fsSL https://pkgs.k8s.io/core:/stable:/v1.32/deb/Release.key | sudo gpg --dearmor -o /etc/apt/keyrings/kubernetes-apt-keyring.gpg -
Add the appropriate Kubernetes
aptrepository. Please note that this repository have packages only for Kubernetes 1.32; for other Kubernetes minor versions, you need to change the Kubernetes minor version in the URL to match your desired minor version (you should also check that you are reading the documentation for the version of Kubernetes that you plan to install).# This overwrites any existing configuration in /etc/apt/sources.list.d/kubernetes.list echo 'deb [signed-by=/etc/apt/keyrings/kubernetes-apt-keyring.gpg] https://pkgs.k8s.io/core:/stable:/v1.32/deb/ /' | sudo tee /etc/apt/sources.list.d/kubernetes.list -
Update the
aptpackage index, install kubelet, kubeadm and kubectl, and pin their version:sudo apt-get update sudo apt-get install -y kubelet kubeadm kubectl sudo apt-mark hold kubelet kubeadm kubectl -
(Optional) Enable the kubelet service before running kubeadm:
sudo systemctl enable --now kubelet
The whole script:
sudo apt-get update
# apt-transport-https may be a dummy package; if so, you can skip that package
sudo apt-get install -y apt-transport-https ca-certificates curl gpg
# If the directory `/etc/apt/keyrings` does not exist, it should be created before the curl command, read the note below.
# sudo mkdir -p -m 755 /etc/apt/keyrings
curl -fsSL https://pkgs.k8s.io/core:/stable:/v1.32/deb/Release.key | sudo gpg --dearmor -o /etc/apt/keyrings/kubernetes-apt-keyring.gpg
# This overwrites any existing configuration in /etc/apt/sources.list.d/kubernetes.list
echo 'deb [signed-by=/etc/apt/keyrings/kubernetes-apt-keyring.gpg] https://pkgs.k8s.io/core:/stable:/v1.32/deb/ /' | sudo tee /etc/apt/sources.list.d/kubernetes.list
sudo apt-get update
sudo apt-get install -y kubelet kubeadm kubectl
sudo apt-mark hold kubelet kubeadm kubectl
sudo systemctl enable --now kubeletKubeadm init
In master node:
sudo kubeadm init \
      --image-repository registry.cn-hangzhou.aliyuncs.com/google_containers \
      --pod-network-cidr 10.244.0.0/16 \
      --cri-socket /run/containerd/containerd.sock \
      --v 5 \
      --ignore-preflight-errors=all
and the result as following:
Your Kubernetes control-plane has initialized successfully!


To start using your cluster, you need to run the following as a regular user:

  mkdir -p $HOME/.kube
  sudo cp -i /etc/kubernetes/admin.conf $HOME/.kube/config
  sudo chown $(id -u):$(id -g) $HOME/.kube/config

Alternatively, if you are the root user, you can run:

  export KUBECONFIG=/etc/kubernetes/admin.conf

You should now deploy a pod network to the cluster.
Run "kubectl apply -f [podnetwork].yaml" with one of the options listed at:
  https://kubernetes.io/docs/concepts/cluster-administration/addons/

Then you can join any number of worker nodes by running the following on each as root:

kubeadm join 192.168.31.80:6443 --token q4dhjp.4qqsvrygn3n3ih9x \
        --discovery-token-ca-cert-hash sha256:fc7d66ef8fc4a7b18857319efa8faed59a456a05eb1e8d6e4bdf753e8c292534
Then you can see:
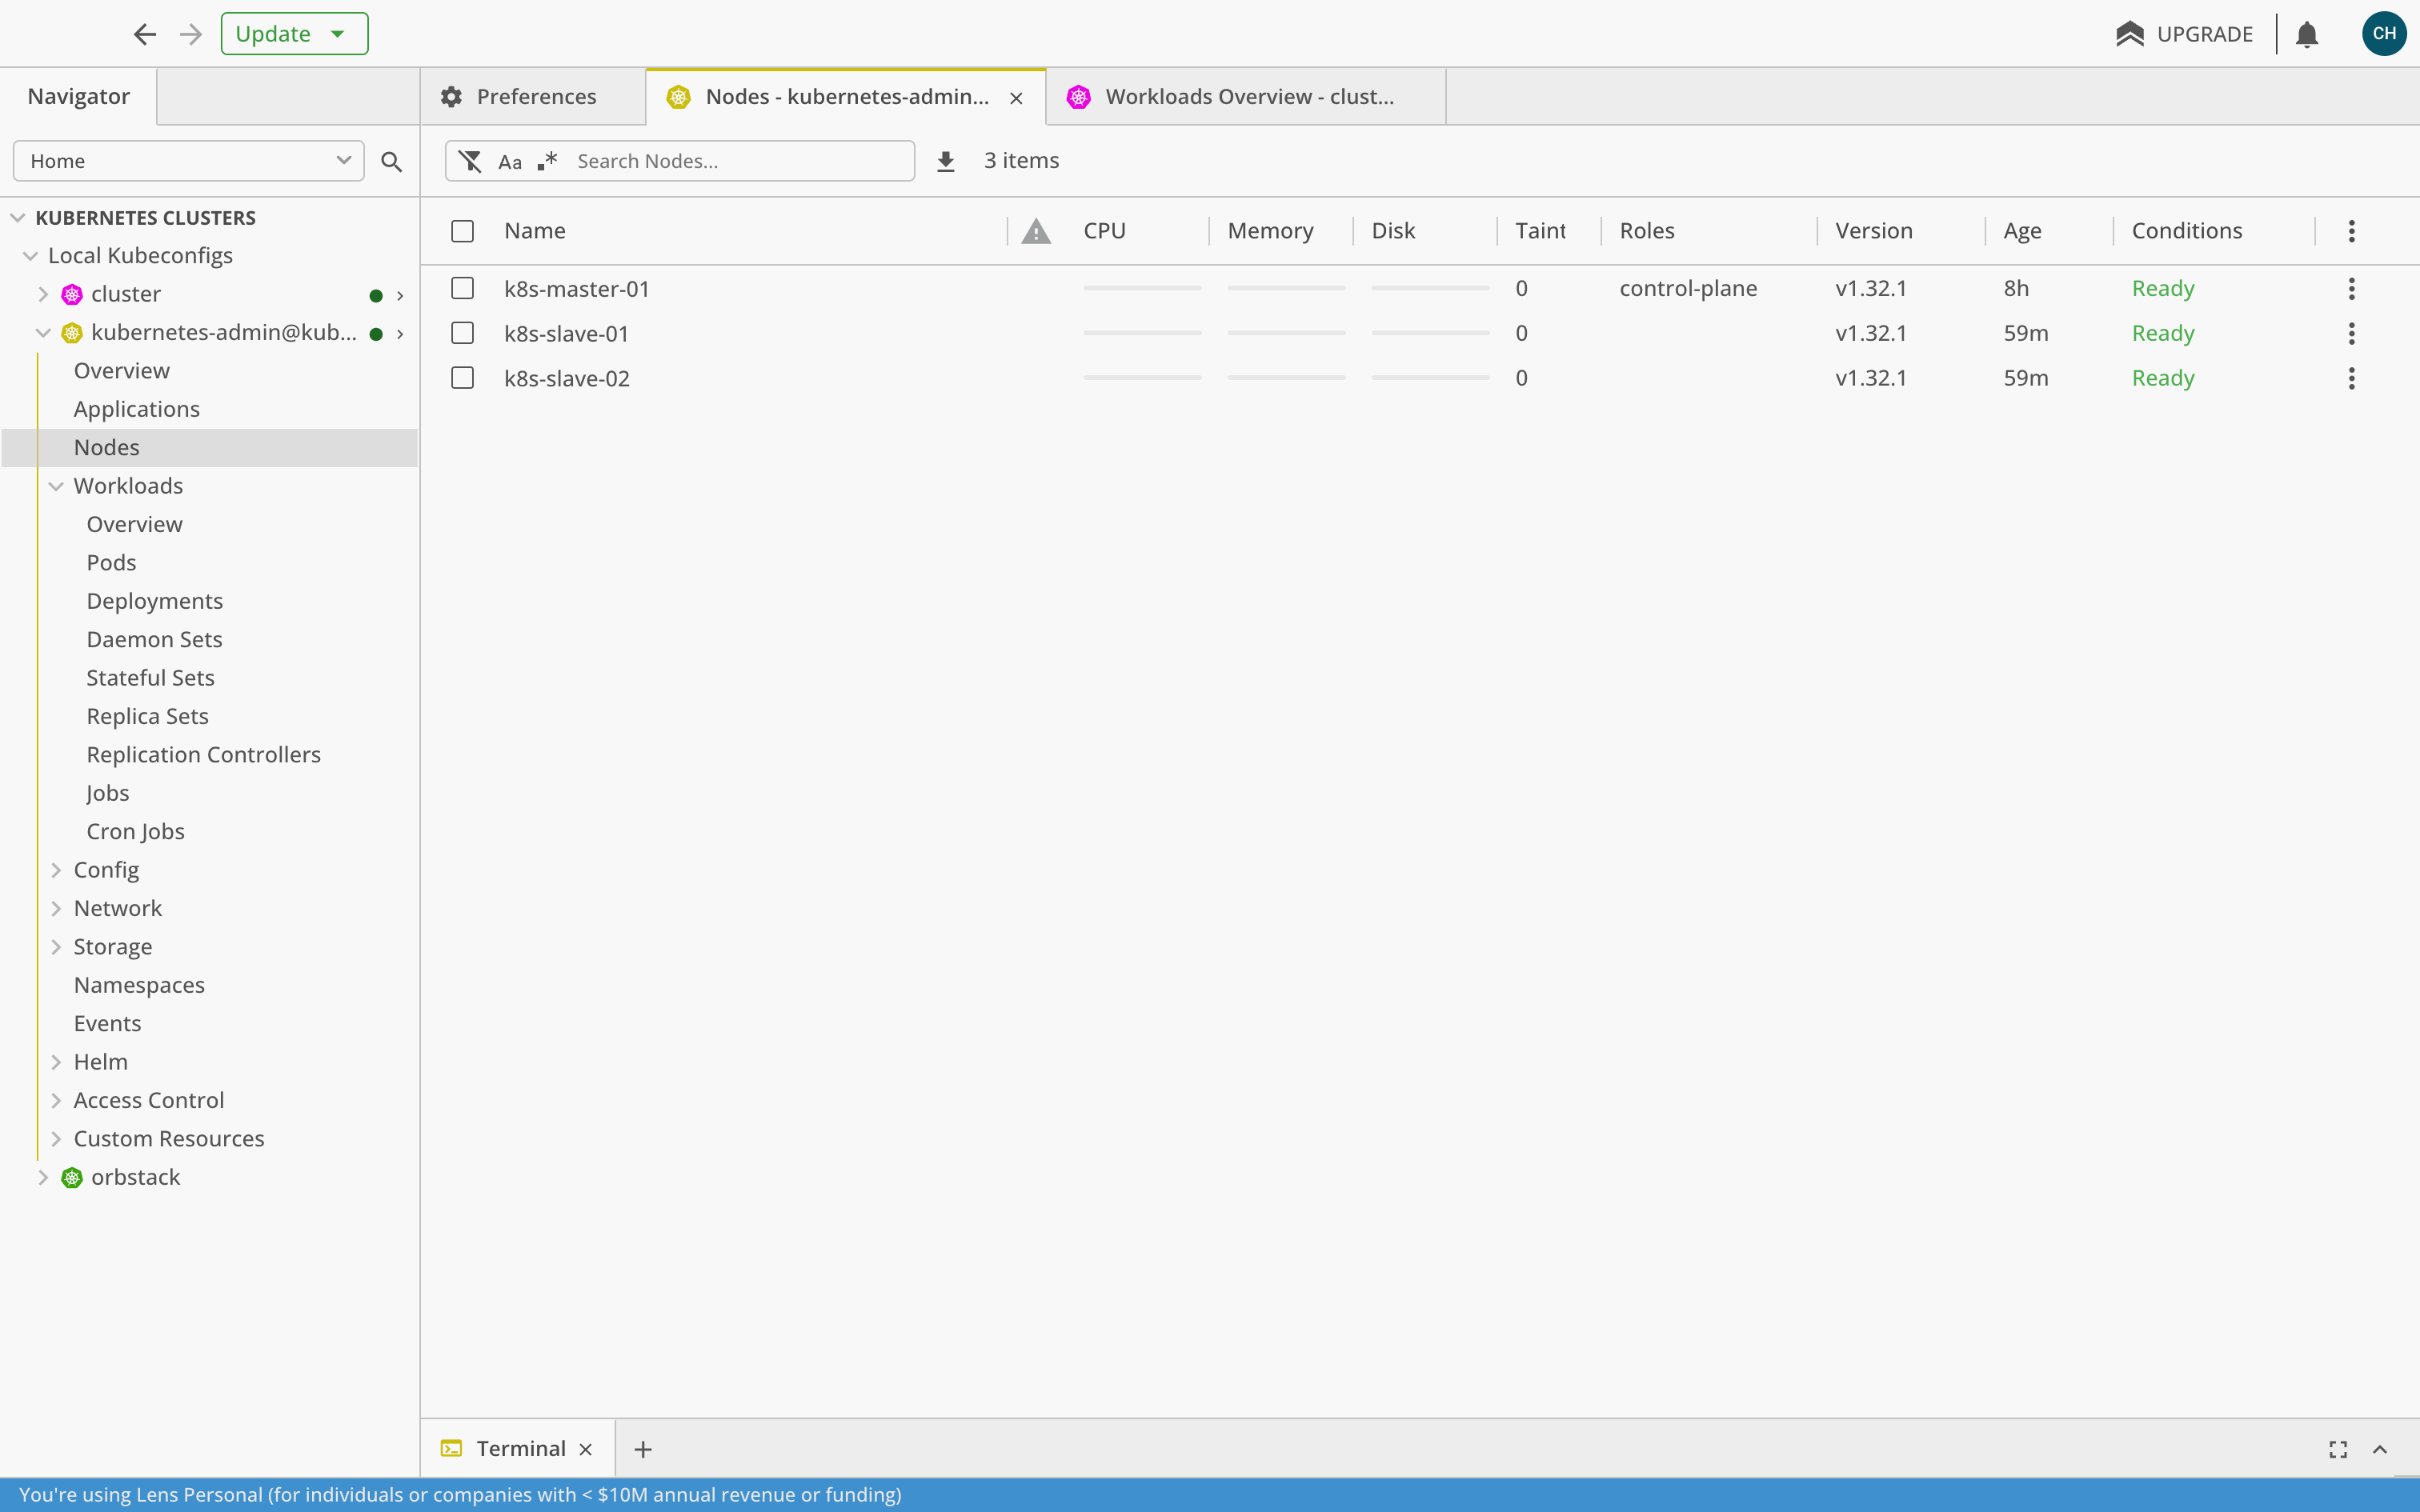
root@k8s-master-01:~# kubectl get nodes -owide
NAME            STATUS     ROLES           AGE   VERSION   INTERNAL-IP     EXTERNAL-IP   OS-IMAGE             KERNEL-VERSION       CONTAINER-RUNTIME
k8s-master-01   NotReady   control-plane   8h    v1.32.1   192.168.31.80   <none>        Ubuntu 22.04.5 LTS   5.15.0-131-generic   containerd://2.0.2
k8s-slave-01    NotReady   <none>          46m   v1.32.1   192.168.31.81   <none>        Ubuntu 22.04.5 LTS   5.15.0-131-generic   containerd://2.0.2
k8s-slave-02    NotReady   <none>          46m   v1.32.1   192.168.31.82   <none>        Ubuntu 22.04.5 LTS   5.15.0-131-generic   containerd://2.0.2
root@k8s-master-01:~#
After Deploy Kubernetes
Install Network Add-ons(Calico)
Install Calico:
kubectl create -f https://raw.githubusercontent.com/projectcalico/calico/v3.29.1/manifests/tigera-operator.yamlAttention, custom-resource.yaml as follows:
# This section includes base Calico installation configuration.
# For more information, see: https://docs.tigera.io/calico/latest/reference/installation/api#operator.tigera.io/v1.Installation
apiVersion: operator.tigera.io/v1
kind: Installation
metadata:
  name: default
spec:
  # Configures Calico networking.
  calicoNetwork:
    ipPools:
    - name: default-ipv4-ippool
      blockSize: 26
      cidr: 10.244.0.0/16
      encapsulation: VXLANCrossSubnet
      natOutgoing: Enabled
      nodeSelector: all()

---

# This section configures the Calico API server.
# For more information, see: https://docs.tigera.io/calico/latest/reference/installation/api#operator.tigera.io/v1.APIServer
apiVersion: operator.tigera.io/v1
kind: APIServer
metadata:
  name: default
spec: {}
cidr must keep with your configuration. For example, mine is 10.244.0.0/16.
kubectl create -f custom-resources.yaml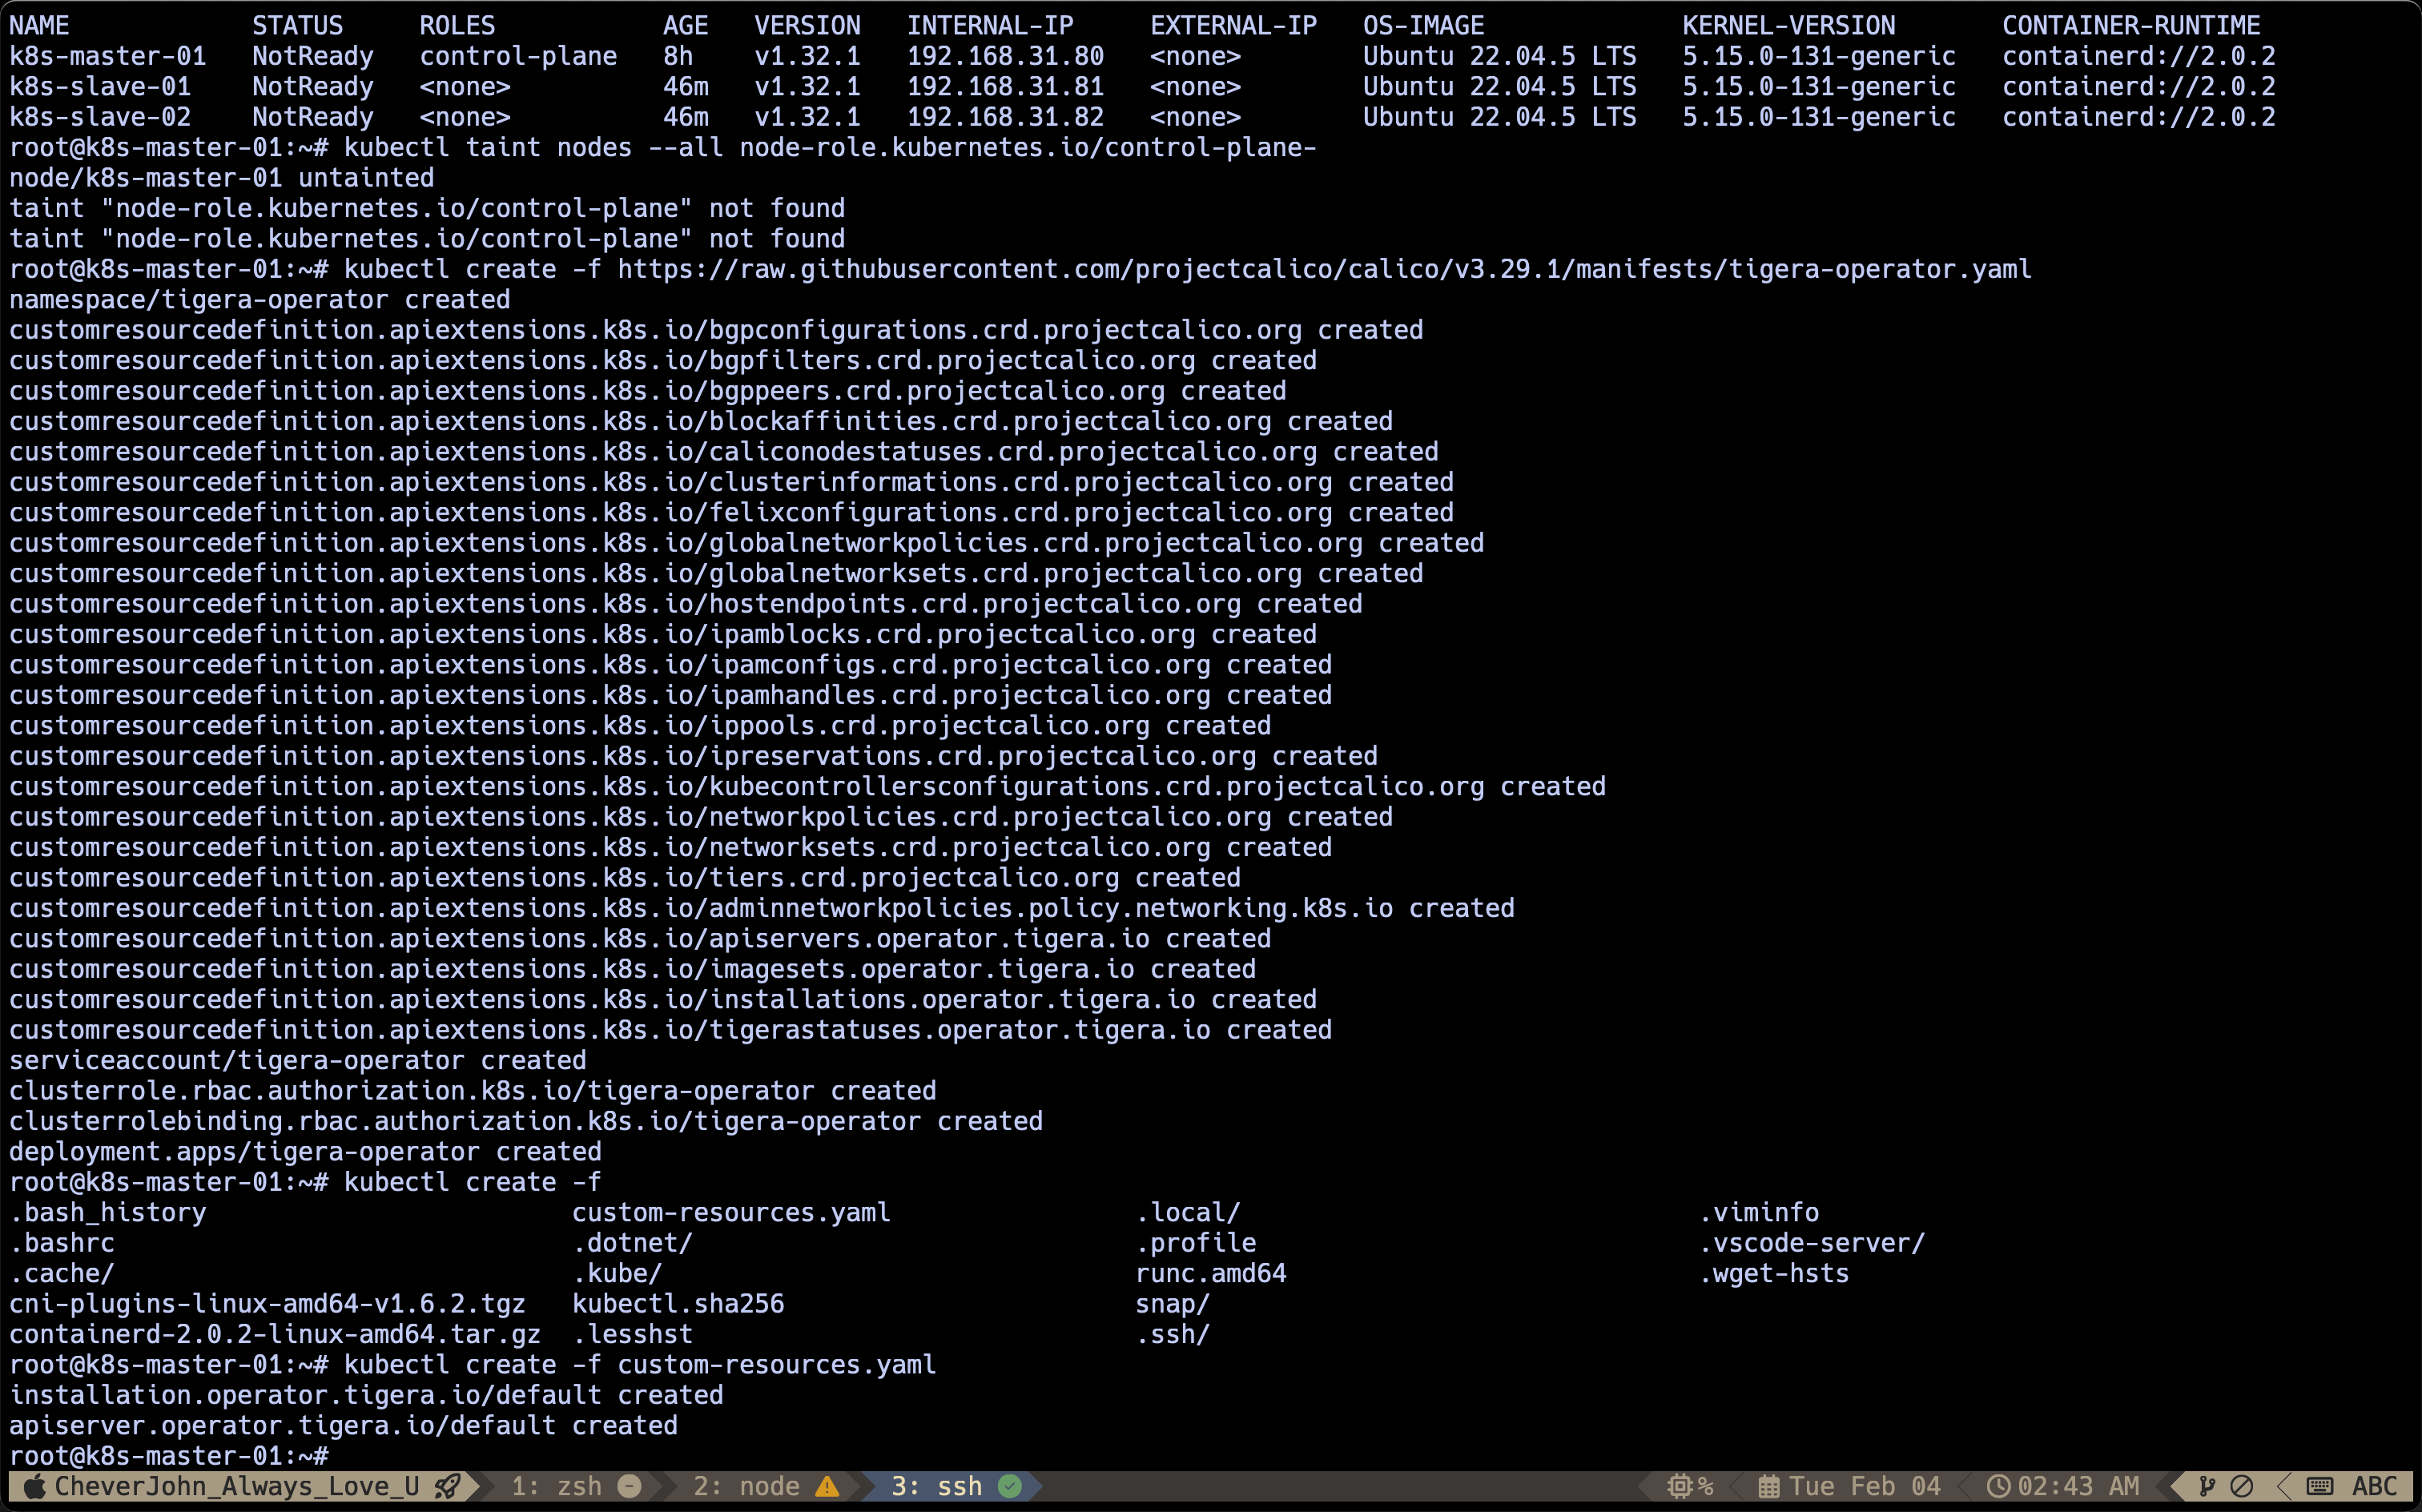
Then everything is OK.